YouTube has a powerful advertising platform that can be used to reach 3 billion users monthly. By creating YouTube video campaigns, you can target users based on their interests, demographics, or life events to find the people who matter most to your business.
In this beginner's guide, you’ll learn how YouTube advertising works and how to set up a YouTube Ads campaign.
How to Advertise on YouTube
Let’s start with an overview of how YouTube ads work. To advertise on YouTube, you need four things:
- A YouTube channel
- A Google Ads Account
- One or more video ads
- Set up one or more video campaigns
1. YouTube Channel - This is the home of your business on YouTube. It can represent your personal brand or business.
You need a YouTube channel before creating a YouTube campaign, as all ads must be uploaded to YouTube first and then used in a campaign.
Let me clarify: You don’t need many videos or subscribers to run a paid campaign on YouTube, but you must have a channel to host your ads.
If you don’t have a channel yet, use our step-by-step guide to create a YouTube channel and get started in minutes.
2. Google Ads Account - All advertising campaigns for YouTube are executed through Google Ads. With Google Ads, you can run campaigns on all Google networks (products and partner websites), including Google Search, Gmail, Discover, and YouTube.
For best results, you should also enable conversion tracking so that you can measure the effectiveness of your YouTube paid campaigns.
3. Video Ads - As you will see below, you can create different kinds of ads depending on what you want to achieve with your campaigns. You can create ads that show before or after a video, in between a video, in the YouTube search results, and many other places.
There are guidelines (more on this below) for what type of ad formats you can design, but you must have the ads uploaded to your own YouTube channel before adding them to a campaign.
4. Video Campaigns - The opportunities are endless. For each campaign, you can specify your target audience, budget, ads, and many other options to ensure that every dollar spent on advertising generates a positive ROI.
YouTube Ads Types
Before getting into the specifics of creating a YouTube video campaign, it’s important to understand what kind of ads you can make, what format to use, and the purpose of each ad type.
On YouTube, you can have four types of ads:
- Skippable in-stream ads
- Bumper ads
- Non-skippable in-stream ads
- In-feed video ads
1. Skippable in-stream ads - These ads can appear before, during, or after other videos on YouTube.
The ads play for 5 seconds before the user is given the option to click the “Skip Ad” button to close the ad.

When using skippable in-stream ads, you are charged when a viewer watches at least 30 seconds of your video, your whole video if it’s less than 30 seconds, or if the user interacts with your ads (clicks on the ad to learn more - i.e., converts).
Skippable in-stream ads are great for all campaigns, including sales, generating leads, getting traffic to your website, and raising brand awareness.
2. Bumper ads - These ads can appear before, during, or after other videos on YouTube, but their maximum length is 6 seconds. Users don’t have the option to skip the ad,s so they have to wait for the ad to finish.
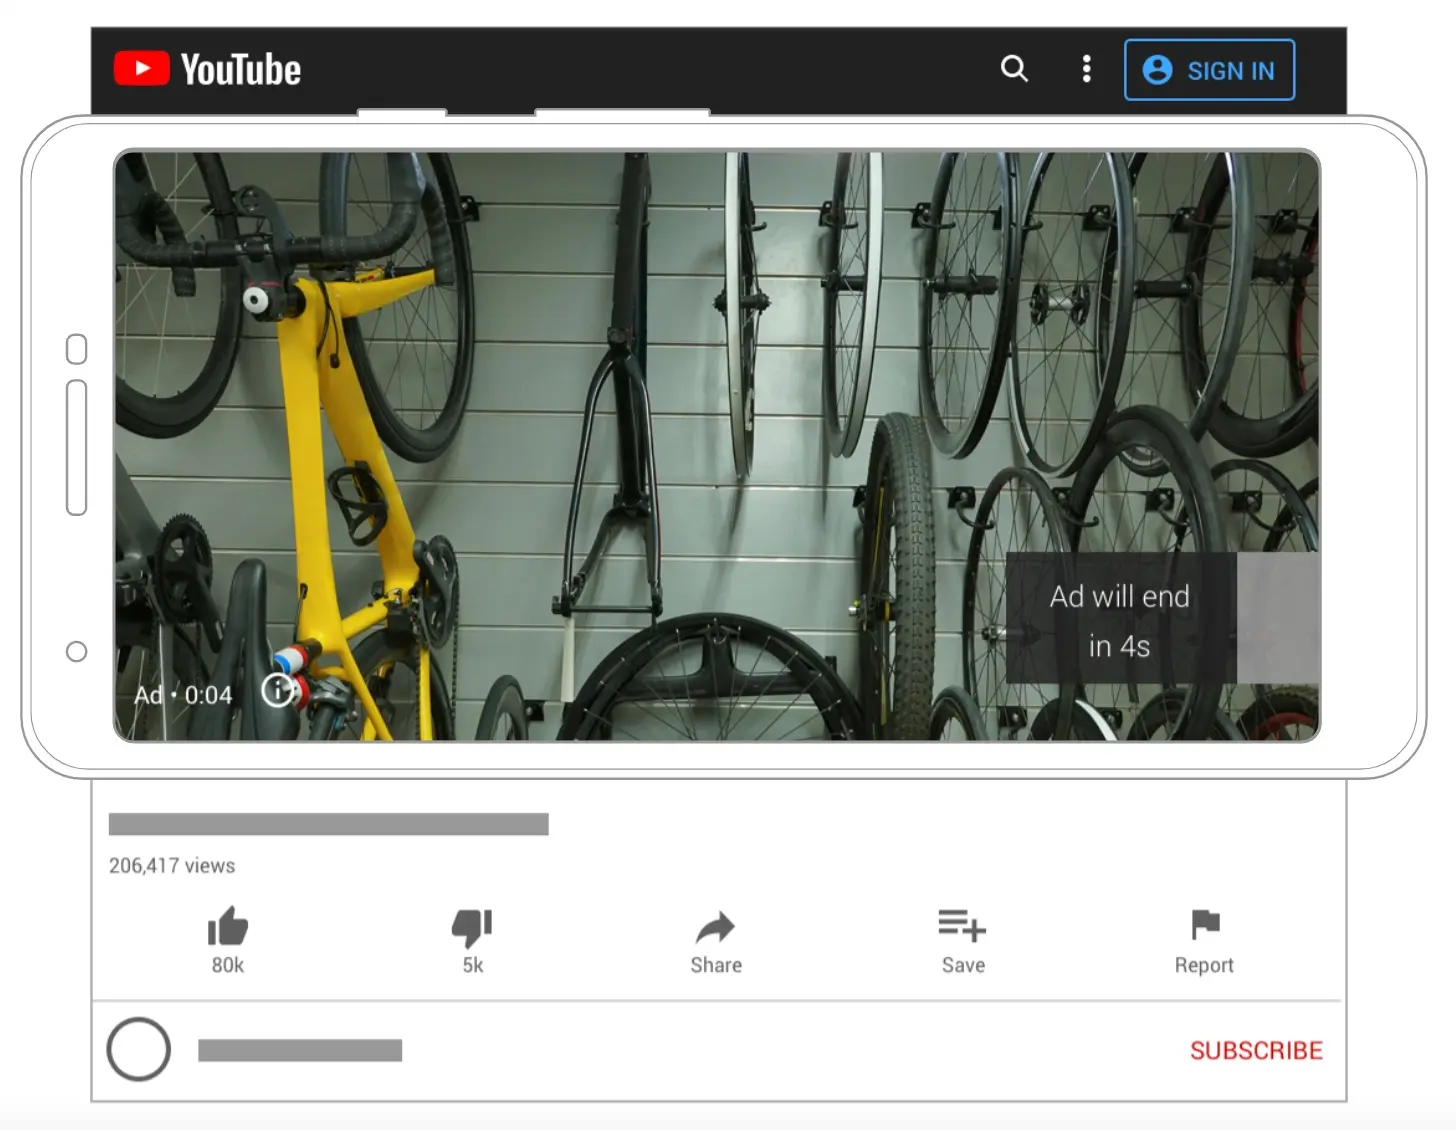
When using bumper ads, you are charged on impressions using Target CPM bidding. With this bidding option, you can specify how much you are willing to pay every thousand times your ad is shown.
Bumper ads are mostly suited for brand awareness campaigns.
3. Non-skippable in-stream ads - These ads appear before, during, or after other videos on YouTube.
Their main difference with skippable in-stream ads is that users don’t have the option to skip the ad.
The main difference with bumper ads (that are also non-skippable) is that non-skippable in-stream ads can be as long as 15 seconds (instead of 6 seconds).
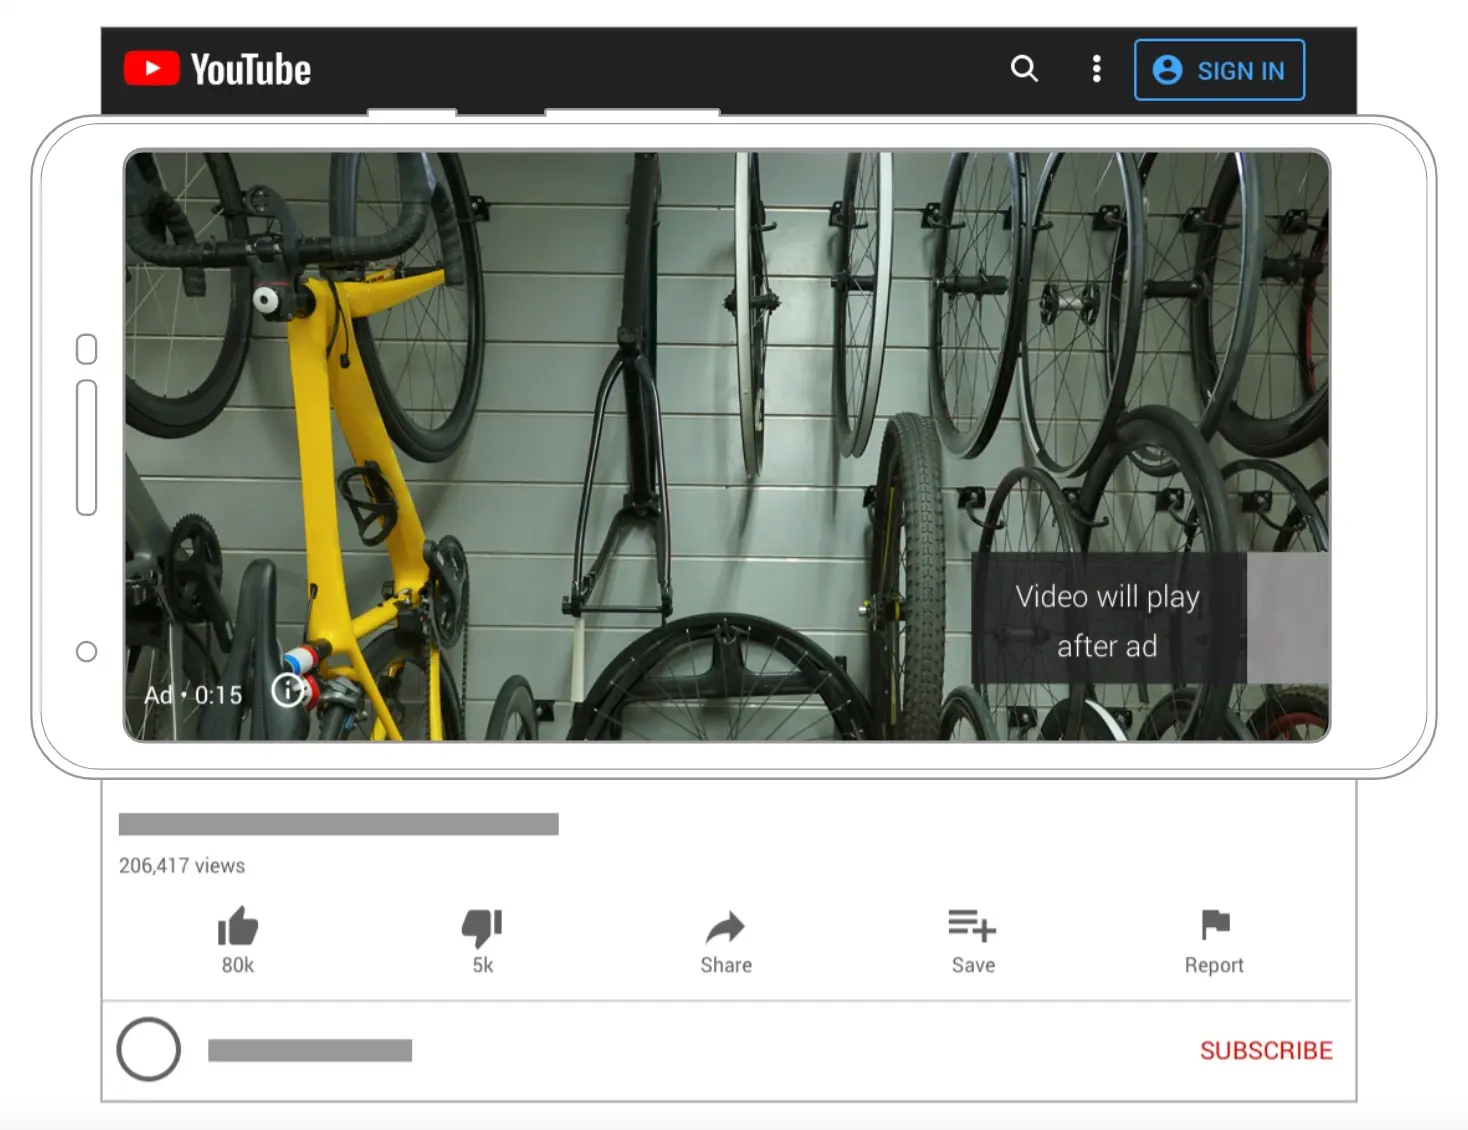
When using non-skippable in-stream ads you are charged on impressions using Target CPM bidding. With this bidding option, you can specify how much you are willing to pay every thousand times your ad is shown.
Non-skippable in-stream ads are great for brand awareness campaigns and increasing sales.
4. In-feed video ads - These ads appear on the YouTube homepage, YouTube search results, next to related YouTube videos, or as recommended videos.
An In-feed video ad shows a thumbnail image (from your video) and the text you choose when creating the ad.

When using in-feed video ads, you are charged when viewers click on a thumbnail and watch your video ad (regardless of what they will do next).
In-feed video ads work great for getting more views and subscribers and making sales.
Here is a summary table of the most important YouTube ad types and what each one does.
| Ad Type | Duration | Placement | Cost |
|---|---|---|---|
| Skippable in-stream ads | 5 seconds | Before, during, or after other videos. | Users watch the ad for 30 seconds or the full ad or interact with the ad. |
| Bumper ads | 6 seconds | Before, during, or after other videos. | Pay per thousand impressions. |
| Non-skippable in-stream ads | 15 seconds | Before, during, or after other videos. | Pay per thousand impressions. |
| In-feed video ads | Any length | YouTube homepage, YouTube search results, next to related YouTube videos. | A user interacts with the ad. |
Now that you have a good idea of how YouTube ads work, let’s see how to create a Google Ads campaign.
How to Create a YouTube Ads Campaign Step-By-Step
Follow these steps to create a video campaign for your channel and videos.
1. Create a New Video Campaign
Log in to your Google Ads account and click the NEW CAMPAIGN button.
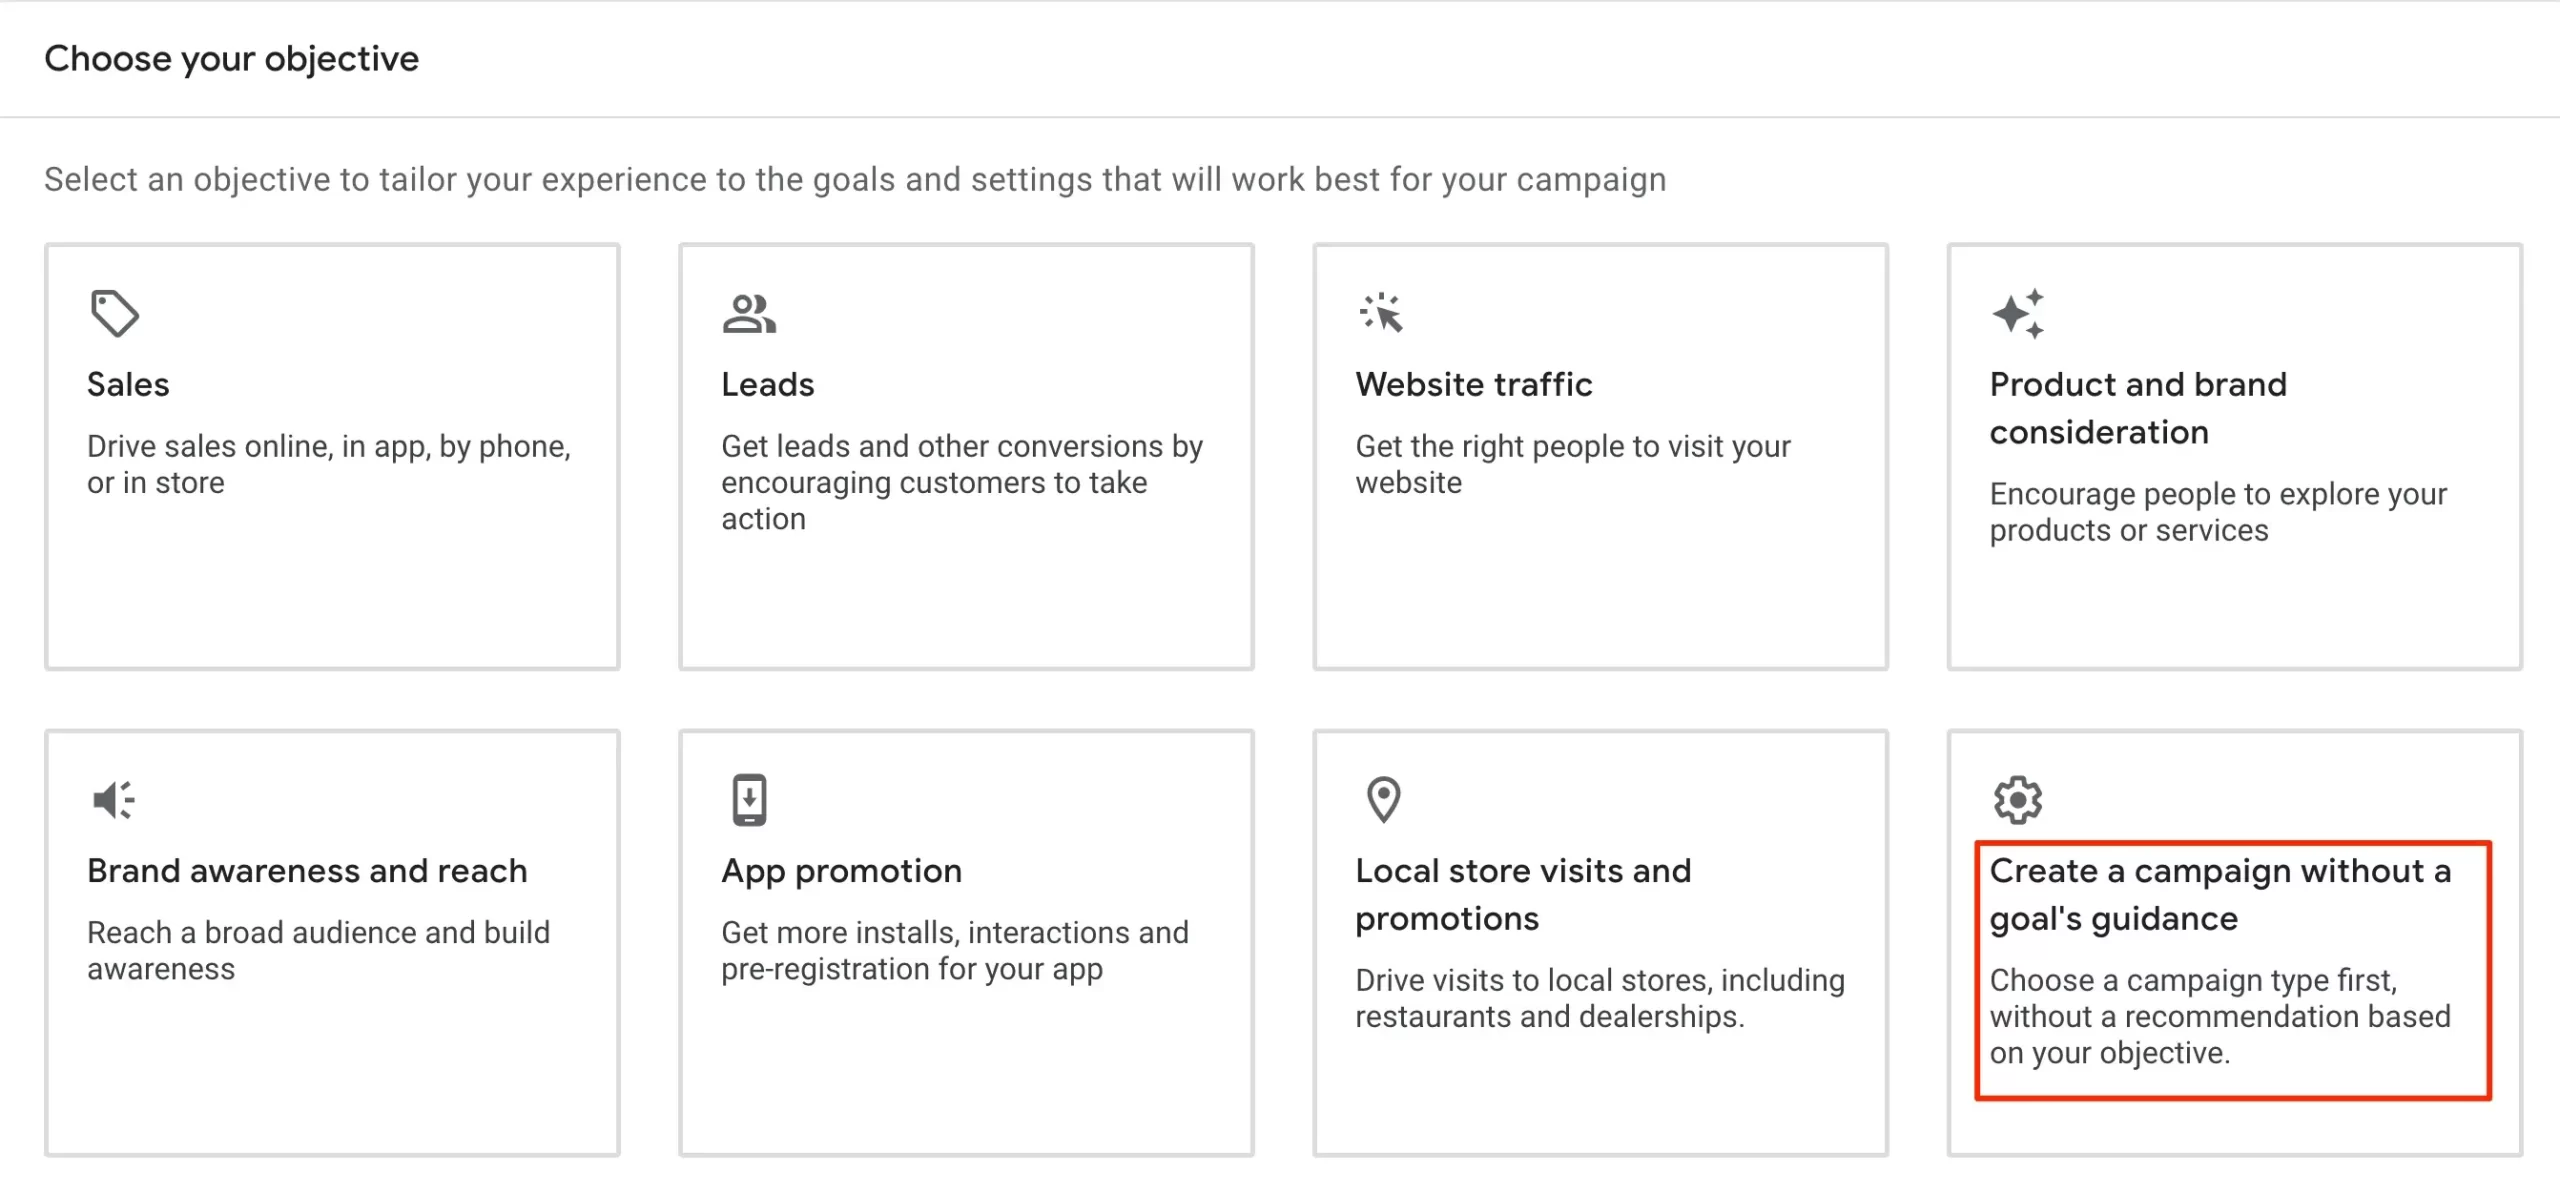
Select “Create a Campaign without a goal’s guidance” and click CONTINUE.
Select VIDEO as the campaign type.
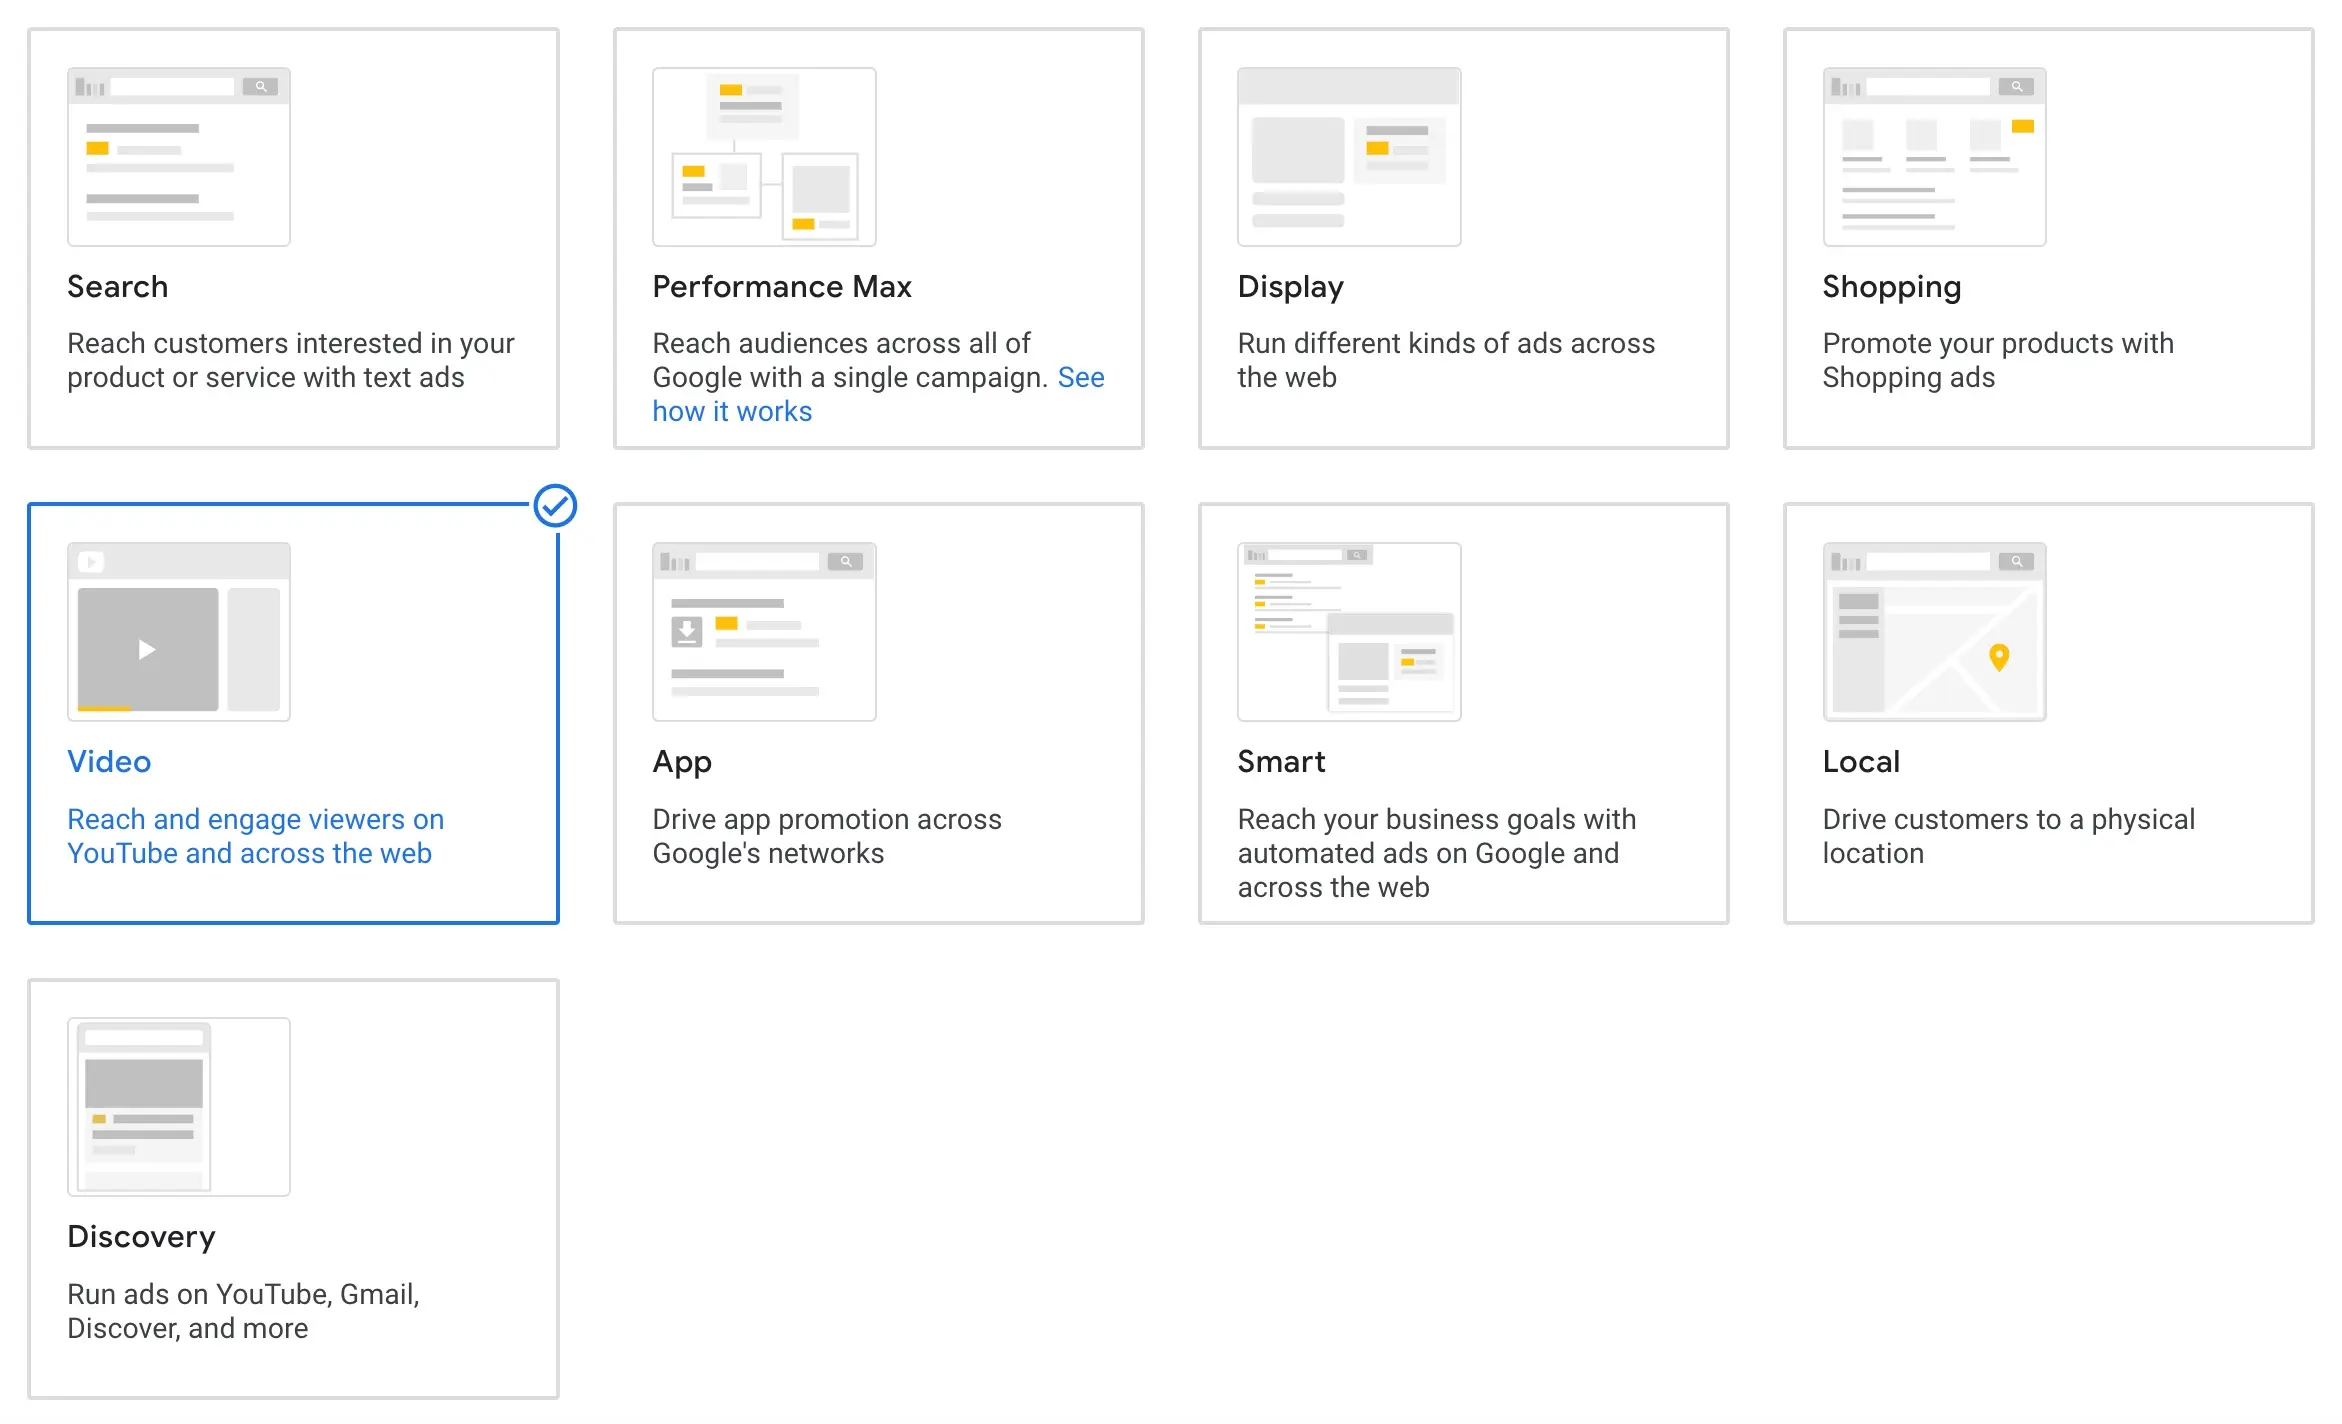
Select CUSTOM VIDEO CAMPAIGN as the campaign subtype and click CONTINUE.

2. Set Your Bid Strategy and Budget
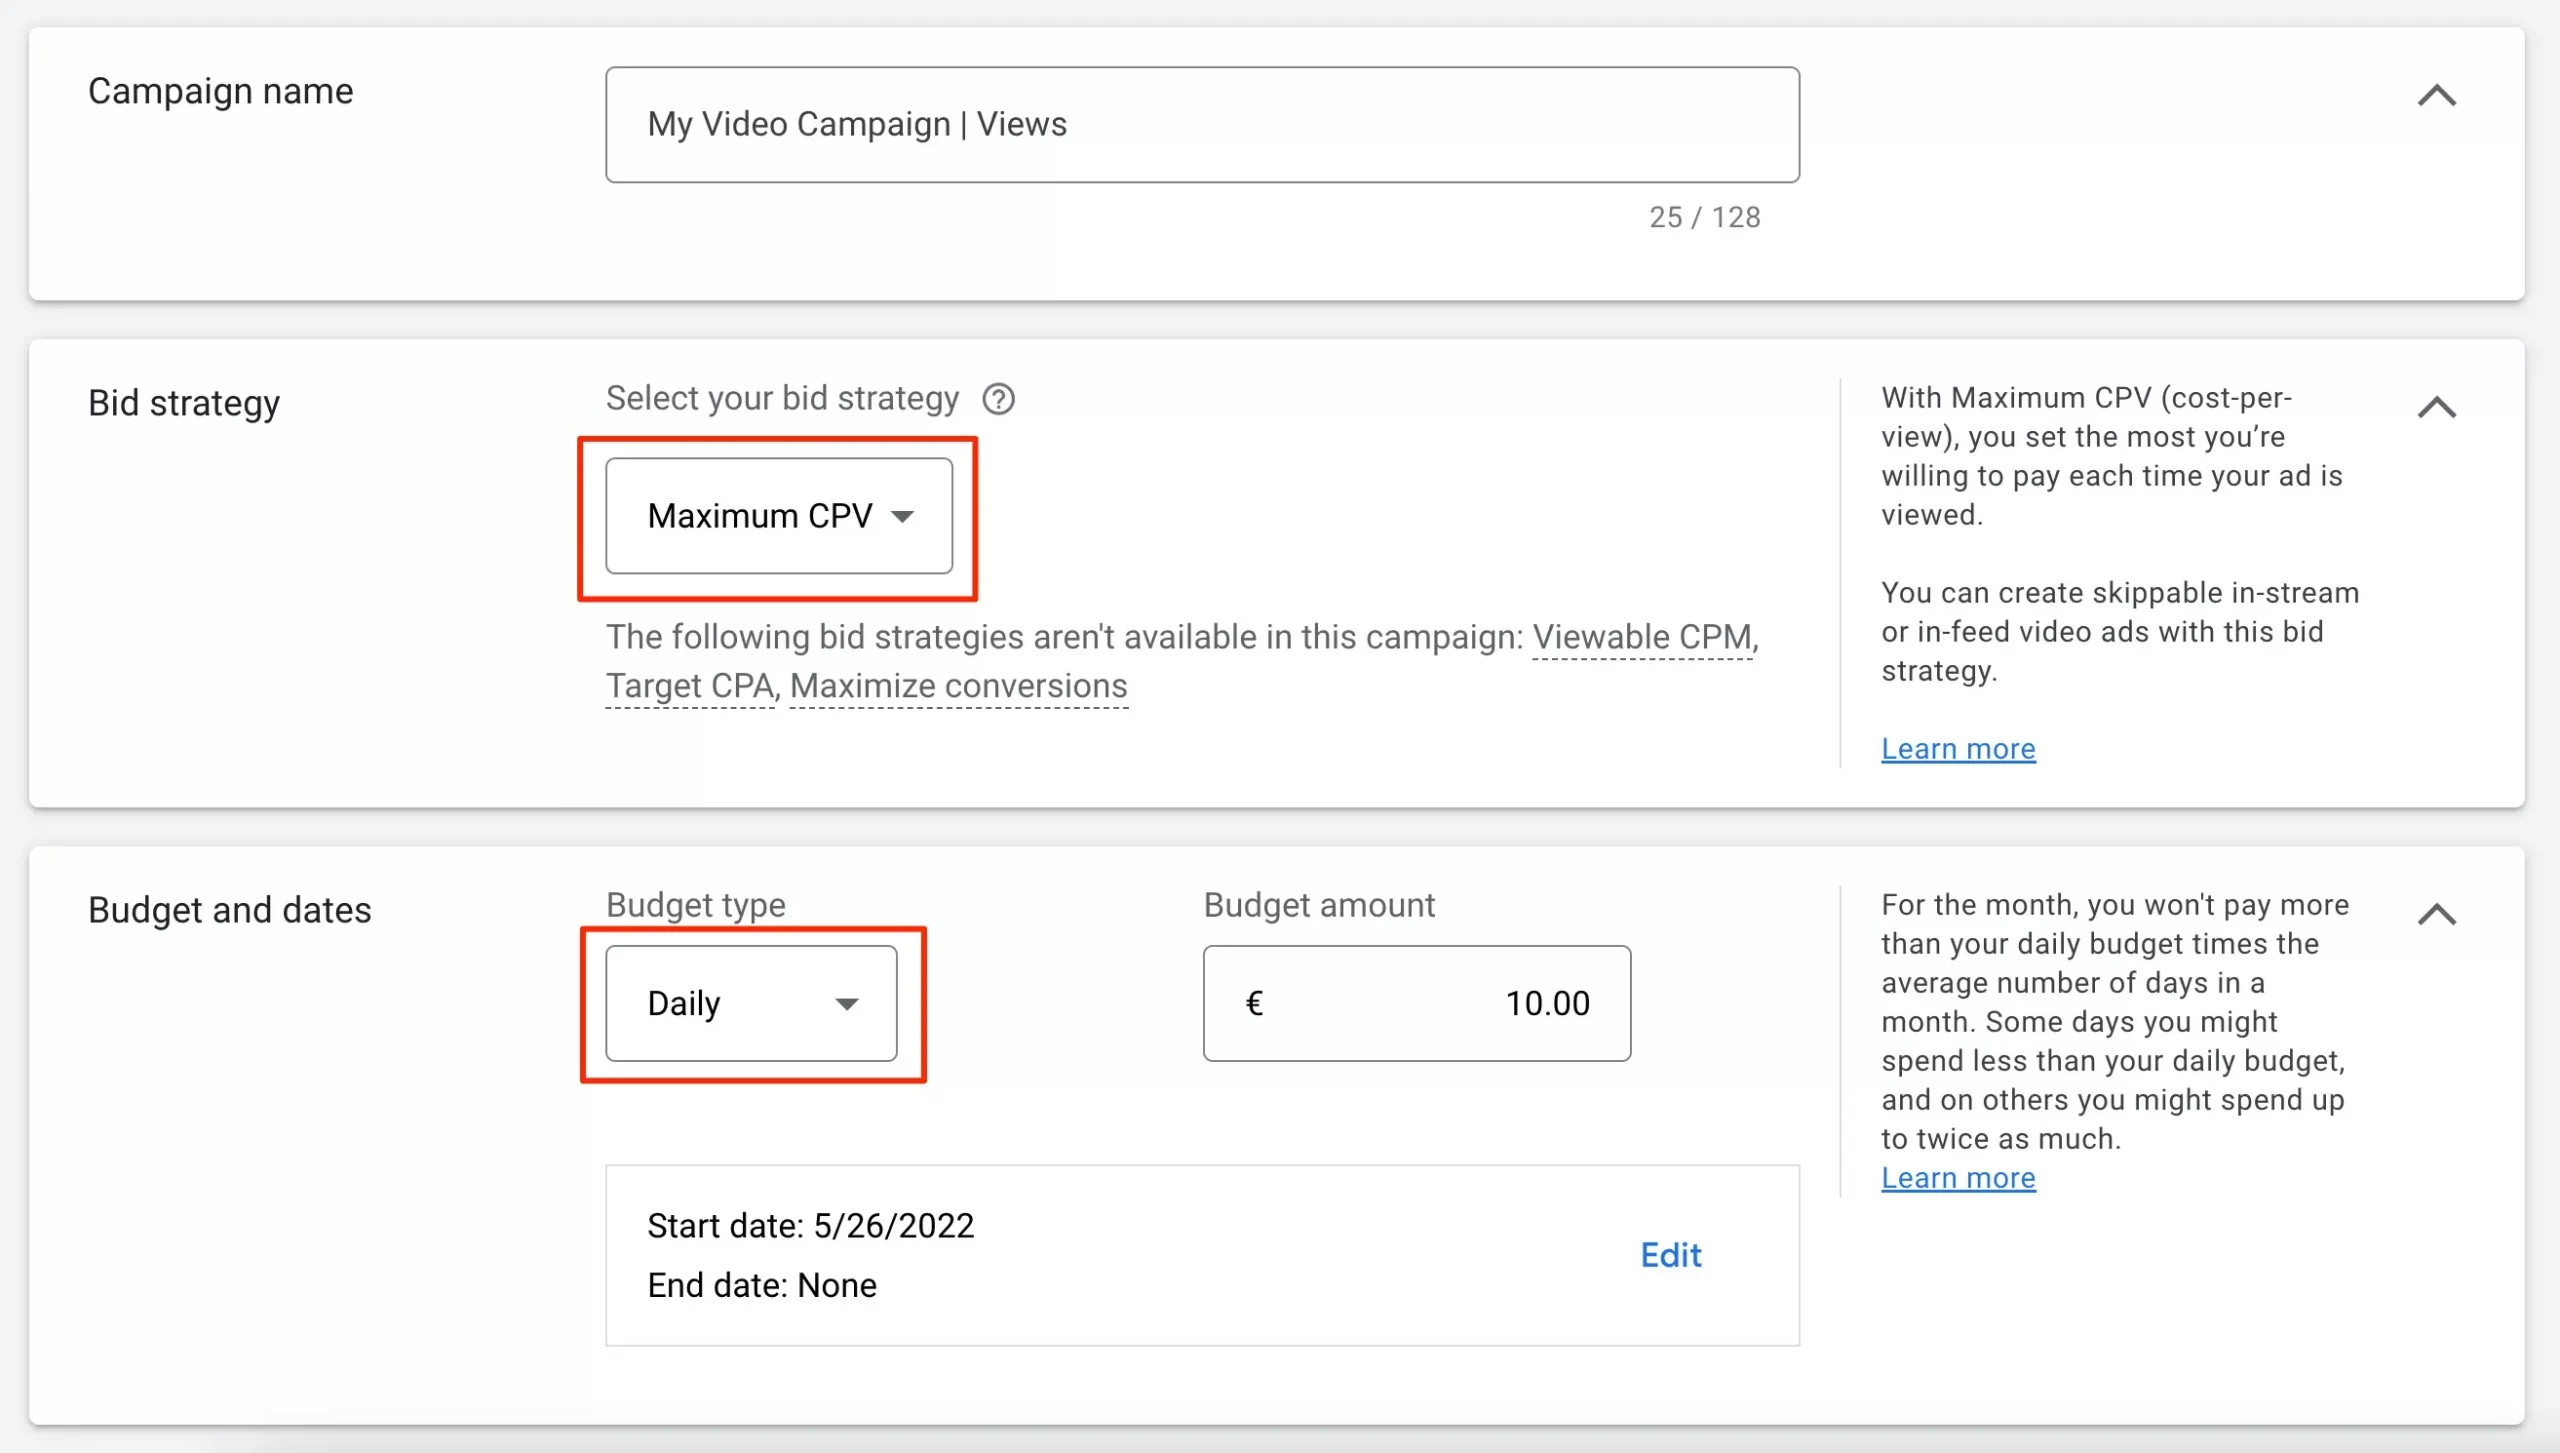
Campaign name - provide a meaningful name for your campaign.
Bid strategy - Select MAXIMUM CPV. With this bidding option, you can decide the maximum amount you want to pay when your ad is viewed.
Budget and dates - for the budget type, select DAILY and set the maximum amount you want to spend per day on this campaign.
As a rule of thumb, when running any type of Google Ads campaign, you should always start a low budget, analyze the results and gradually increase your budget as long as it produces a positive return on investment.
For the purpose of this video campaign, you can start with a budget of $10 per day. Leave the campaign running for two weeks and adjust your budget based on performance.
3. Choose Networks and Locations
Scroll down to adjust the rest of the settings as follows:
Networks - You can exclude “Video partners on the Display Network” to have your ads shown on YouTube search results and YouTube videos and not on websites outside YouTube.
Locations - Use “Enter another location” and target the countries your potential viewers/subscribers live in.

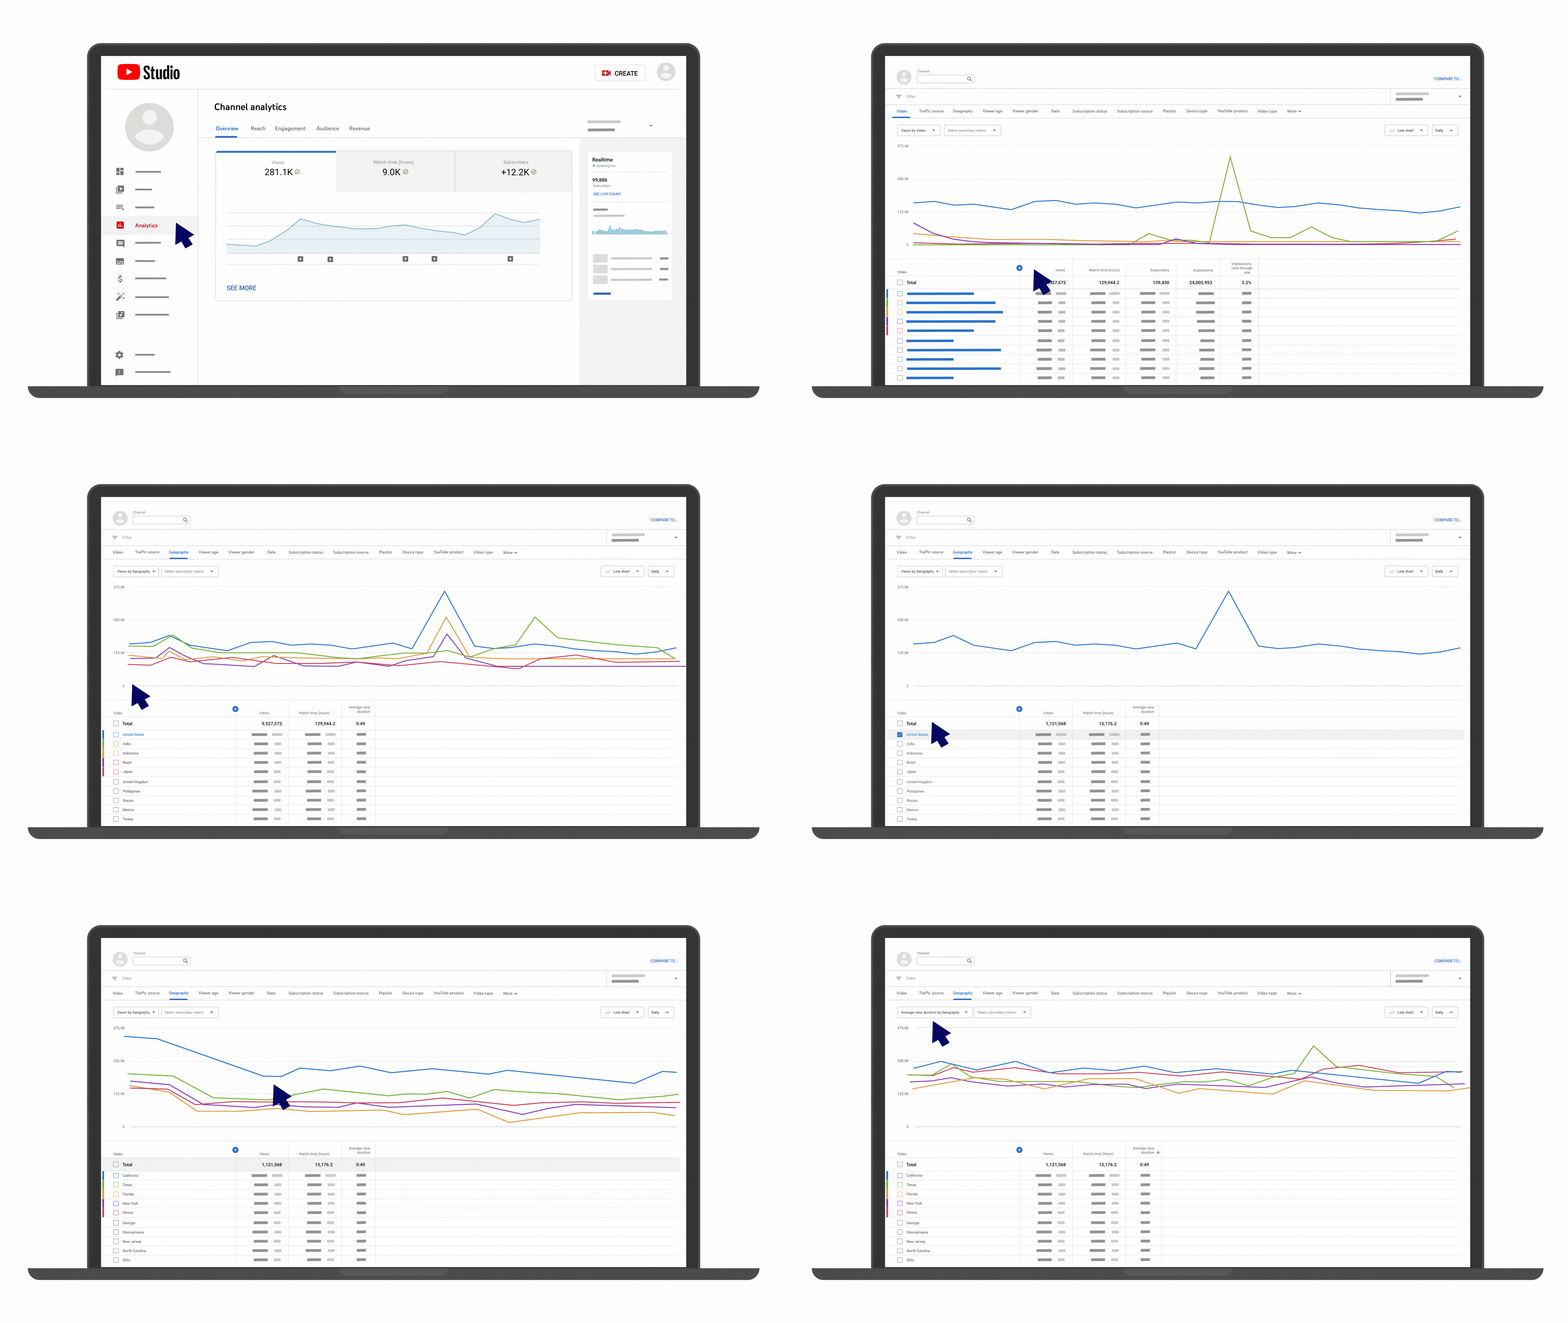
If you already have an established channel, you can use the “Geography” report from your Channel Analytics to find out which countries generate the most video views and target these in your paid campaign.
You can view the “Geography” report by visiting YouTube Studio and then selecting Analytics from the left menu.
Click on the ADVANCED MODE tab and then select GEOGRAPHY.
Use the filters to sort the results by country, number of views, watch time, etc.
If you also have a website or blog associated with your YouTube channel, you can use the GEOLOCATION report in Google Analytics, to find which countries are more likely to be interested in your content.
Languages - select the language your users speak.
Inventory type - leave the default value “Standard Inventory”.
Excluded types and labels - leave their default values that allow your ads to show on all content types except content that is not yet labeled.
Related videos - This option allows you to show 2 to 5 related videos that might appear below your ad on mobile ONLY. This is a nice feature but for the purpose of this campaign, we want to focus on a particular video only so leave this blank and proceed to the next steps.

4. Configure Additional Settings
Next, click the ADDITIONAL SETTINGS dropdown to view and configure these values.
Devices - leave the default values.
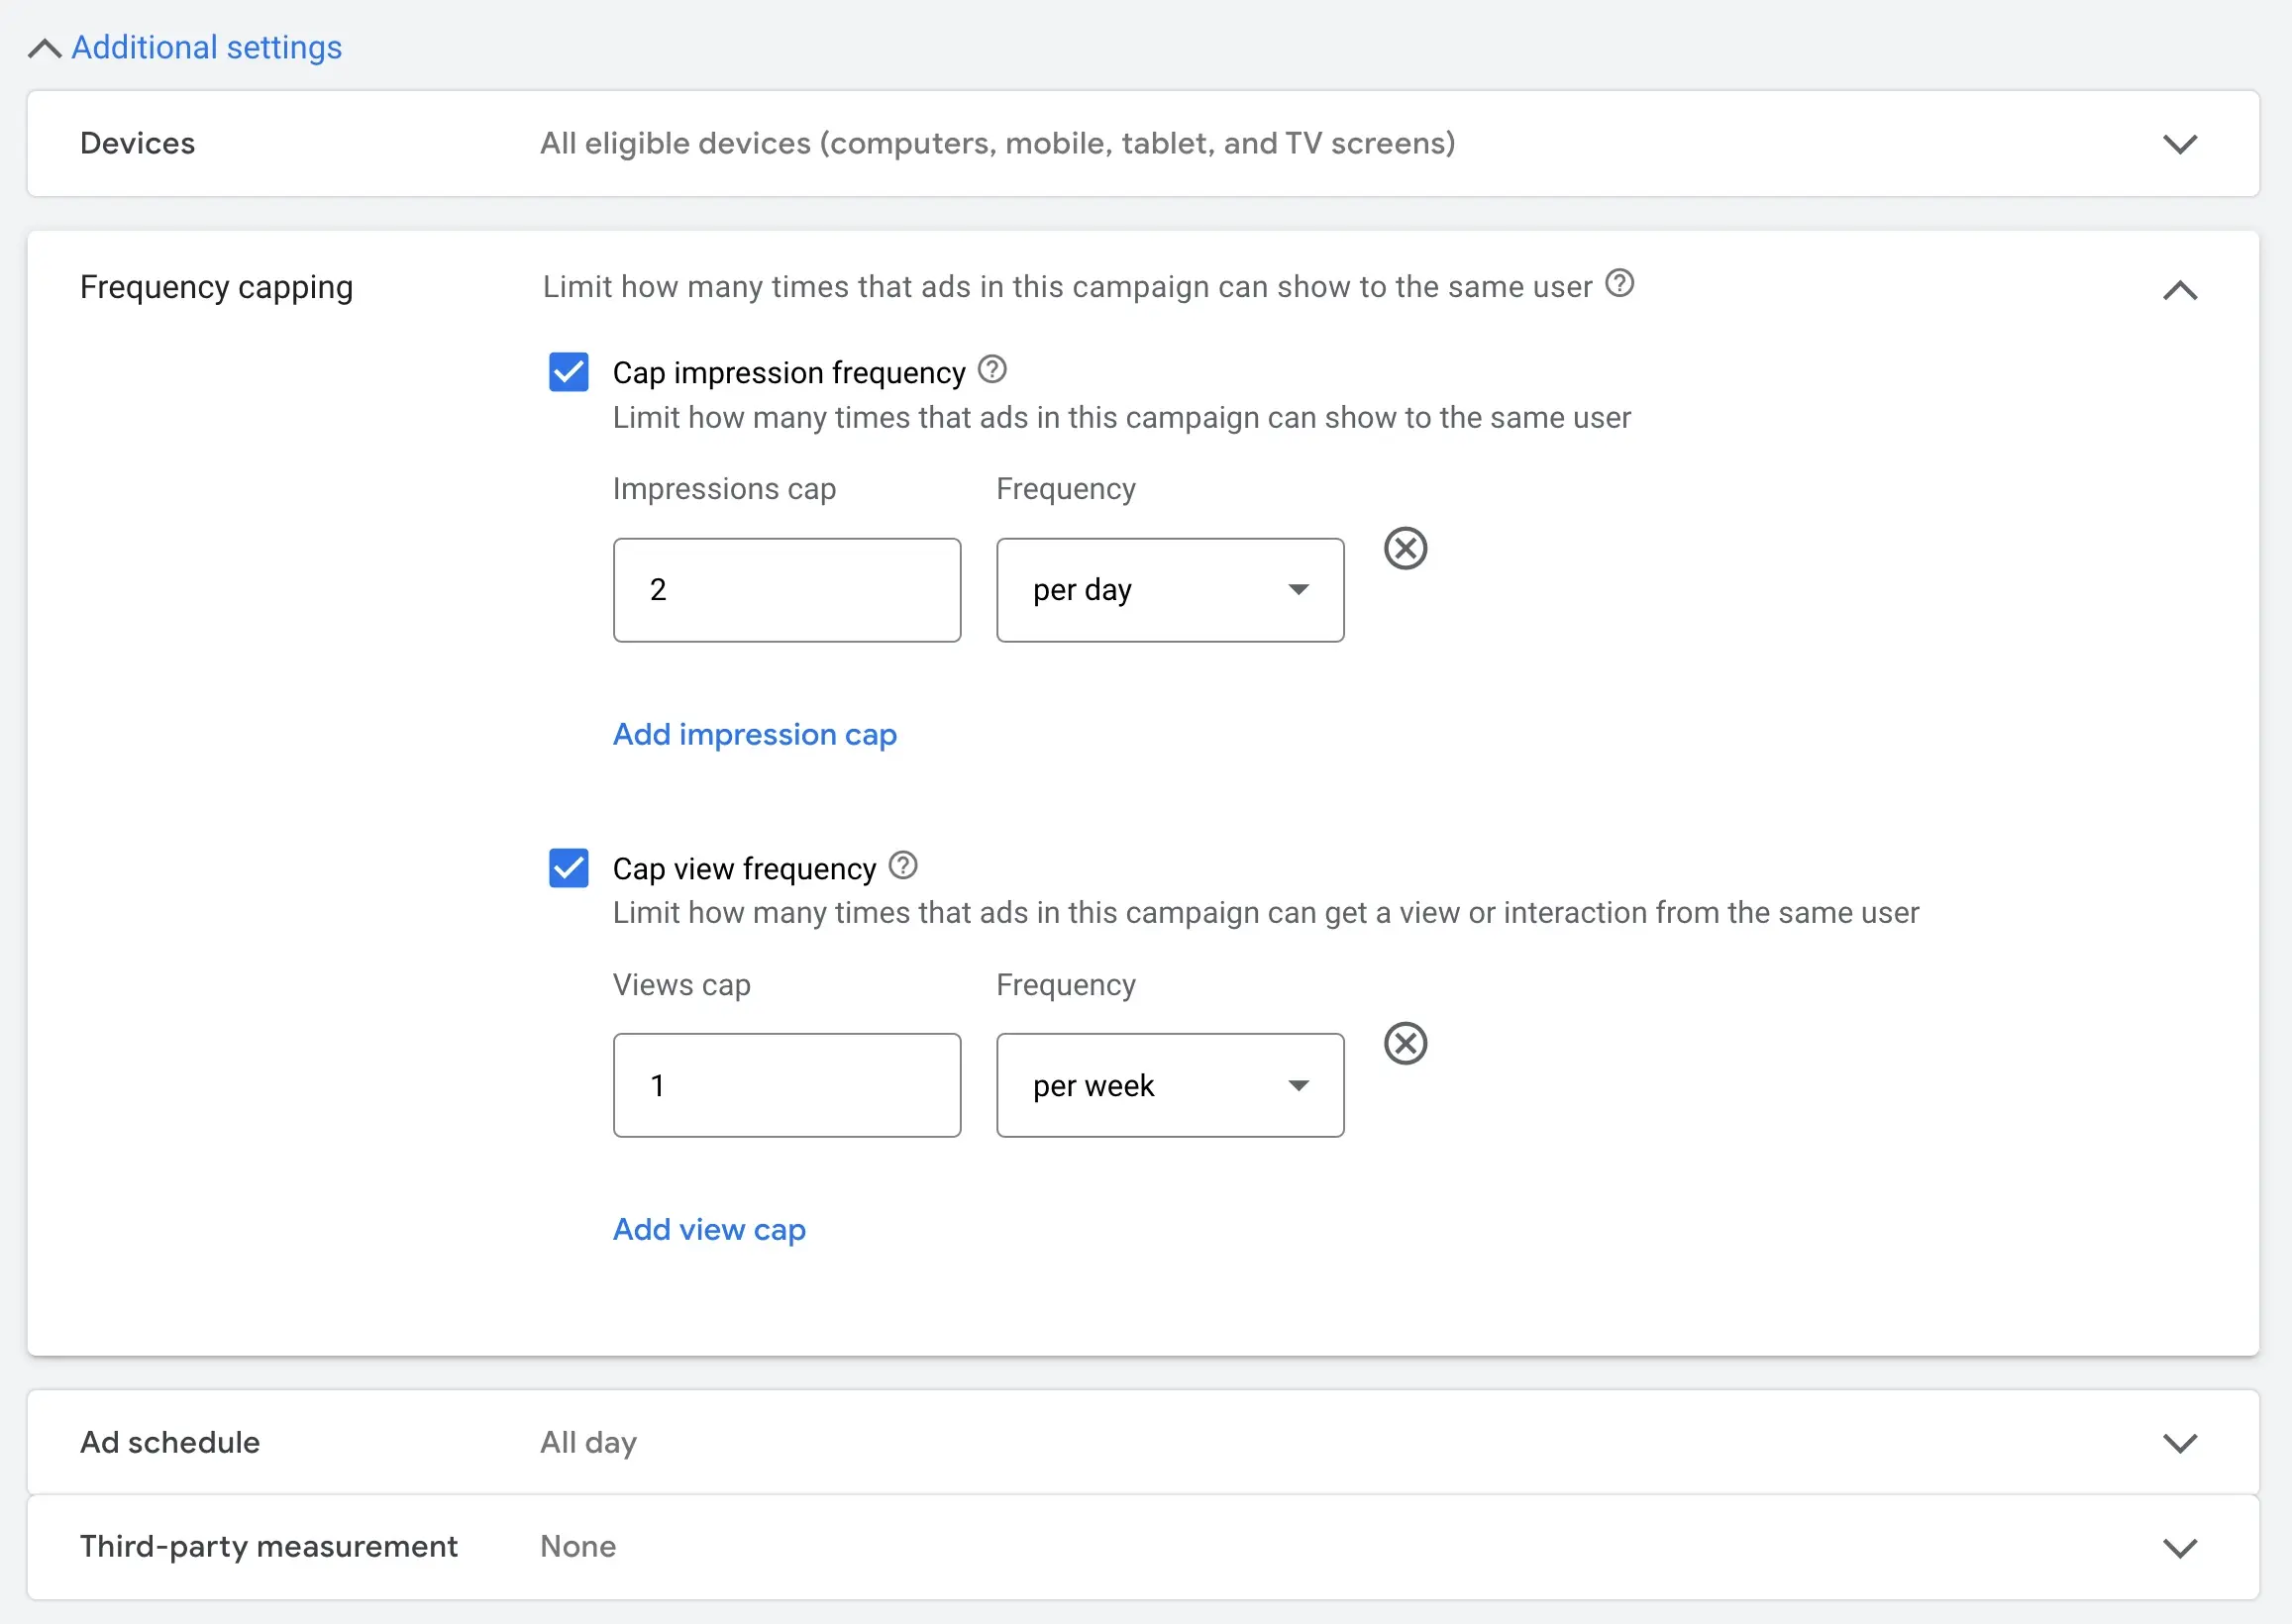
Frequency capping - Frequency capping allows you to set a limit on how many times the ads are shown to the same user.
Check the “Cap impression frequency” and set the “Impressions cap” to 2 per day. This will force the system to show the same ad to the same user a maximum of 2 times per day.
Check the “Cap view frequency” and set the “Views cap” to 1 per week. This will force the system not to show the same ad (for a week) to users that have already viewed or interacted with your ad.
Combining these two settings will expand your ads' reach and show them to as many people as possible.
Ad schedule - keep the default settings.
Third-party measurement - keep the default settings.
5. Create One or More Ad Groups
The next step is creating an ad group and defining your target audience. This is a very important step for the success of your campaigns.
Showing your ads to the wrong audience will waste your budget and views so try to do some homework to figure out exactly which group of people are more likely to be interested in your video ad.
Use the following pointers to get some ideas:
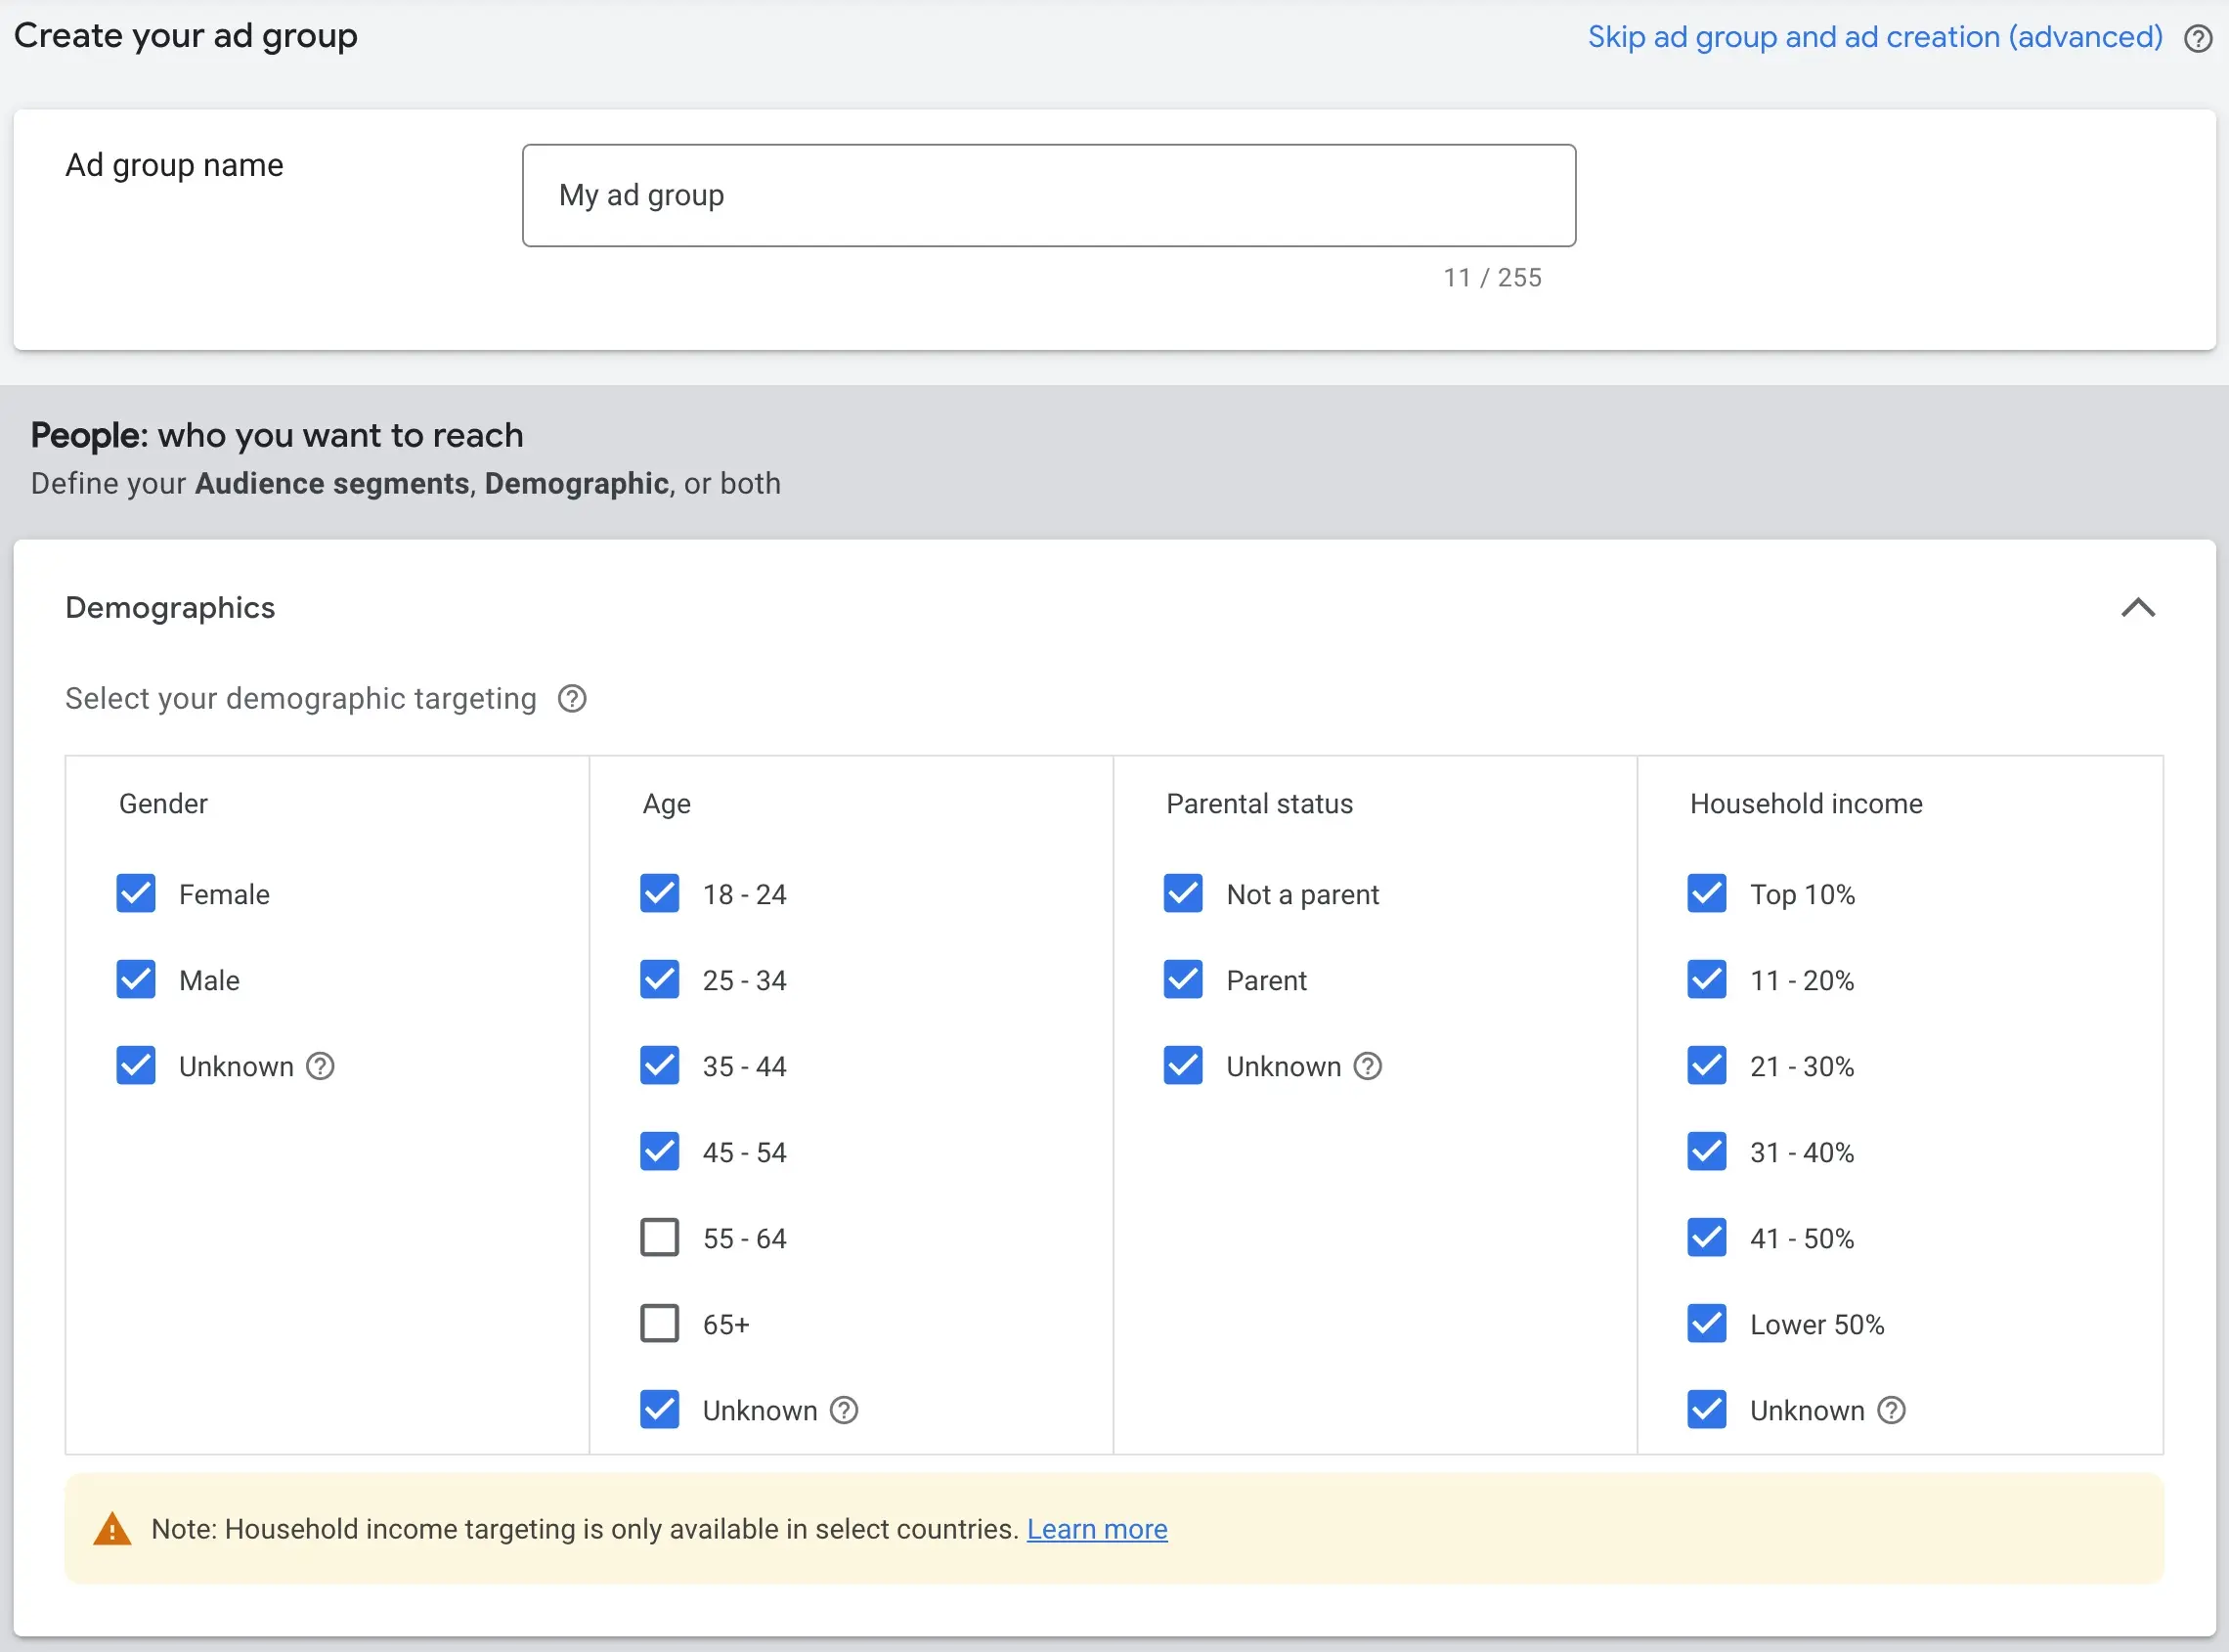
Demographics - exclude an audience group that you are 100% certain is irrelevant to your ad.
For example, if your ad targets young people, you can safely exclude the ‘55-64’ and ‘65+’ age groups.
It is highly recommended to view the “Viewer Age” and “Viewer Gender” reports in your Video Analytics and the Demographics Report in Google Analytics to find out the demographic characteristics your existing audience has.
Keep all “Unknown” groups checked. Removing any of the “unknown” groups will limit your reach.
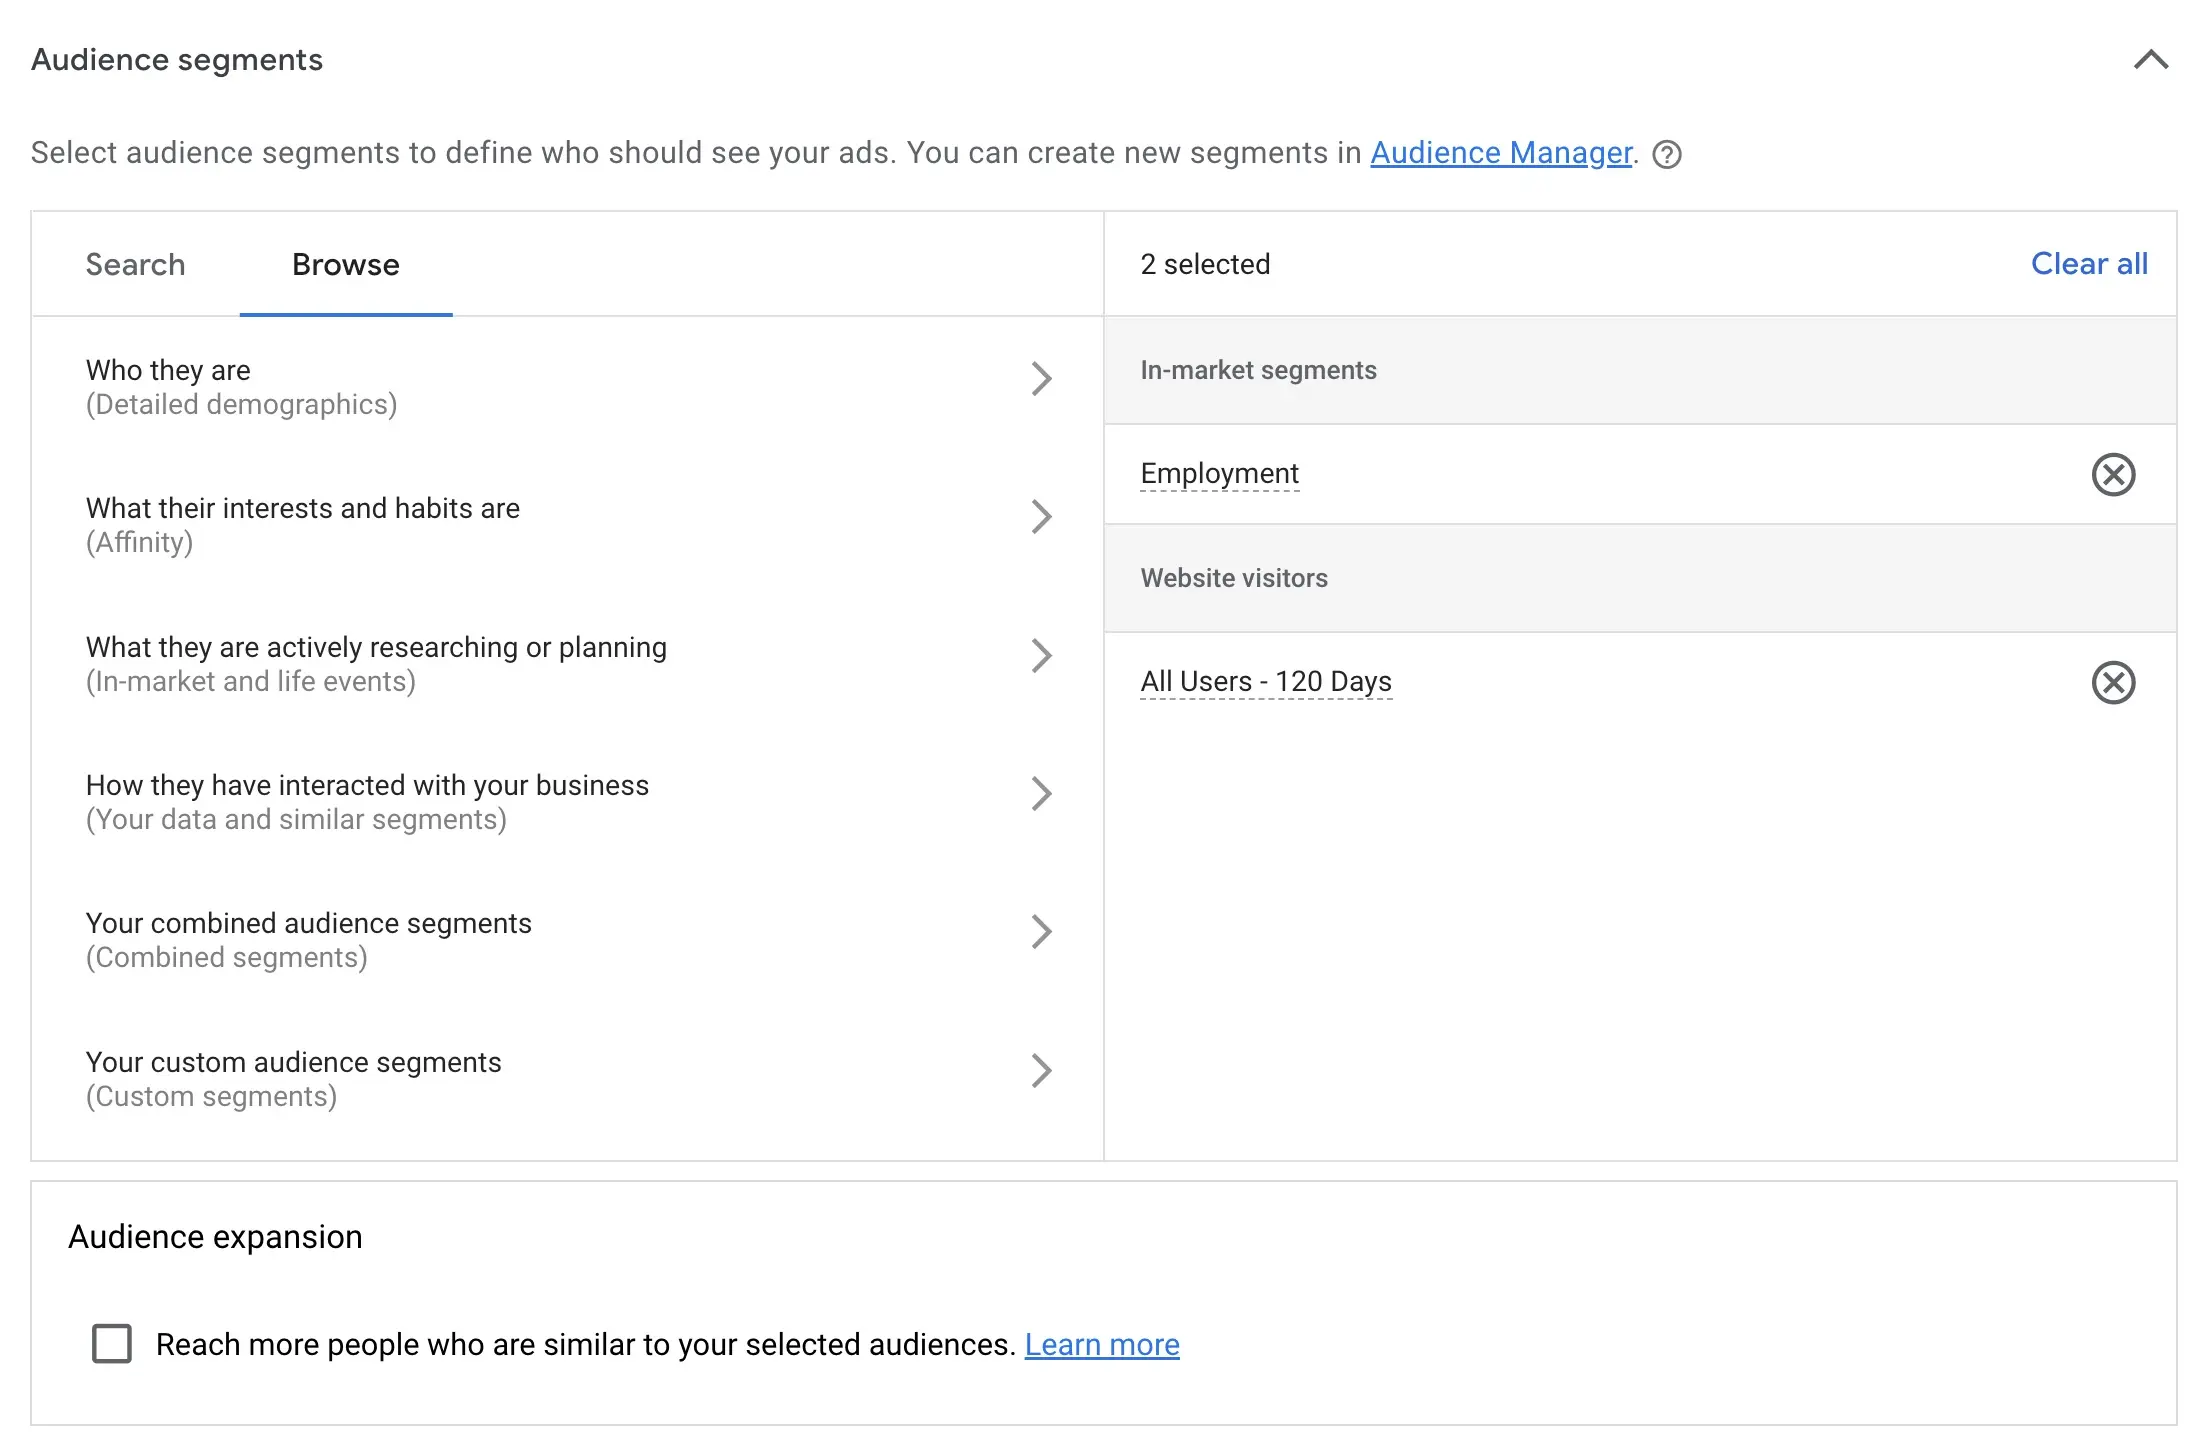
Audience Segments - you can use audience segments to define who should see your ads. For best practices, follow these tips:
If you already have a website associated with your channel, target your existing website visitors in your campaigns. Showing your video to people already familiar with your brand will increase your chances of people viewing and interacting with your video.
To do this, click the BROWSE button and select “How they have interacted with your business”, expand WEBSITE VISITORS and select “ALL WEBSITE USERS”.
Next, you should go through the options “Who they are”, “What their interests and habits are”, “What they are actively researching or planning” and choose the most relevant audiences.
I’ve mentioned this before but the best way to find which audiences to include is to look in your Google Analytics reports and in particular the Interests report (located under Audience > Demographics > Interests) and add the audiences that are more valuable to your business.
The next step is to specify keywords for your video ads, choose topics, and select placements.
Keywords - Our goal with this campaign is to get more views and subscribers by showing our video ad on YouTube search results and next-to-related videos.
The keywords option gives us the opportunity to specify exactly for which keywords to trigger our ads and it’s important to use the right keywords.
What you should be careful of is not to limit the audience size too much as this will reduce the chances of getting views and it will also increase the cost.
As you add keywords, look at the “Available Impressions” estimate to understand how a keyword impacts the audience size.
For best practices, use the same keywords you have used to optimize your video as identified during the YouTube keyword research process.
Topics - you can select to show ads on content about specific subjects. Do not check any topics as this is not applicable for this type of campaign.
Placements - you can choose specific channels or videos to show your ads. Do not specify any channels as this is not what we want to achieve with this campaign.

Before proceeding to the next step, review your demographics, audience segments, and content setting once more to ensure that:
- You’re targeting people in the most appropriate demographic groups
- You’re targeting the right audiences
- You’re targeting the keywords that accurately represent the content for your video.
6. Create Video Ads
The first step is to specify the URL of your video. It’s a prerequisite for your video to be hosted on your YouTube channel. If you haven’t done this already, you can follow the instructions here to upload a video on YouTube.
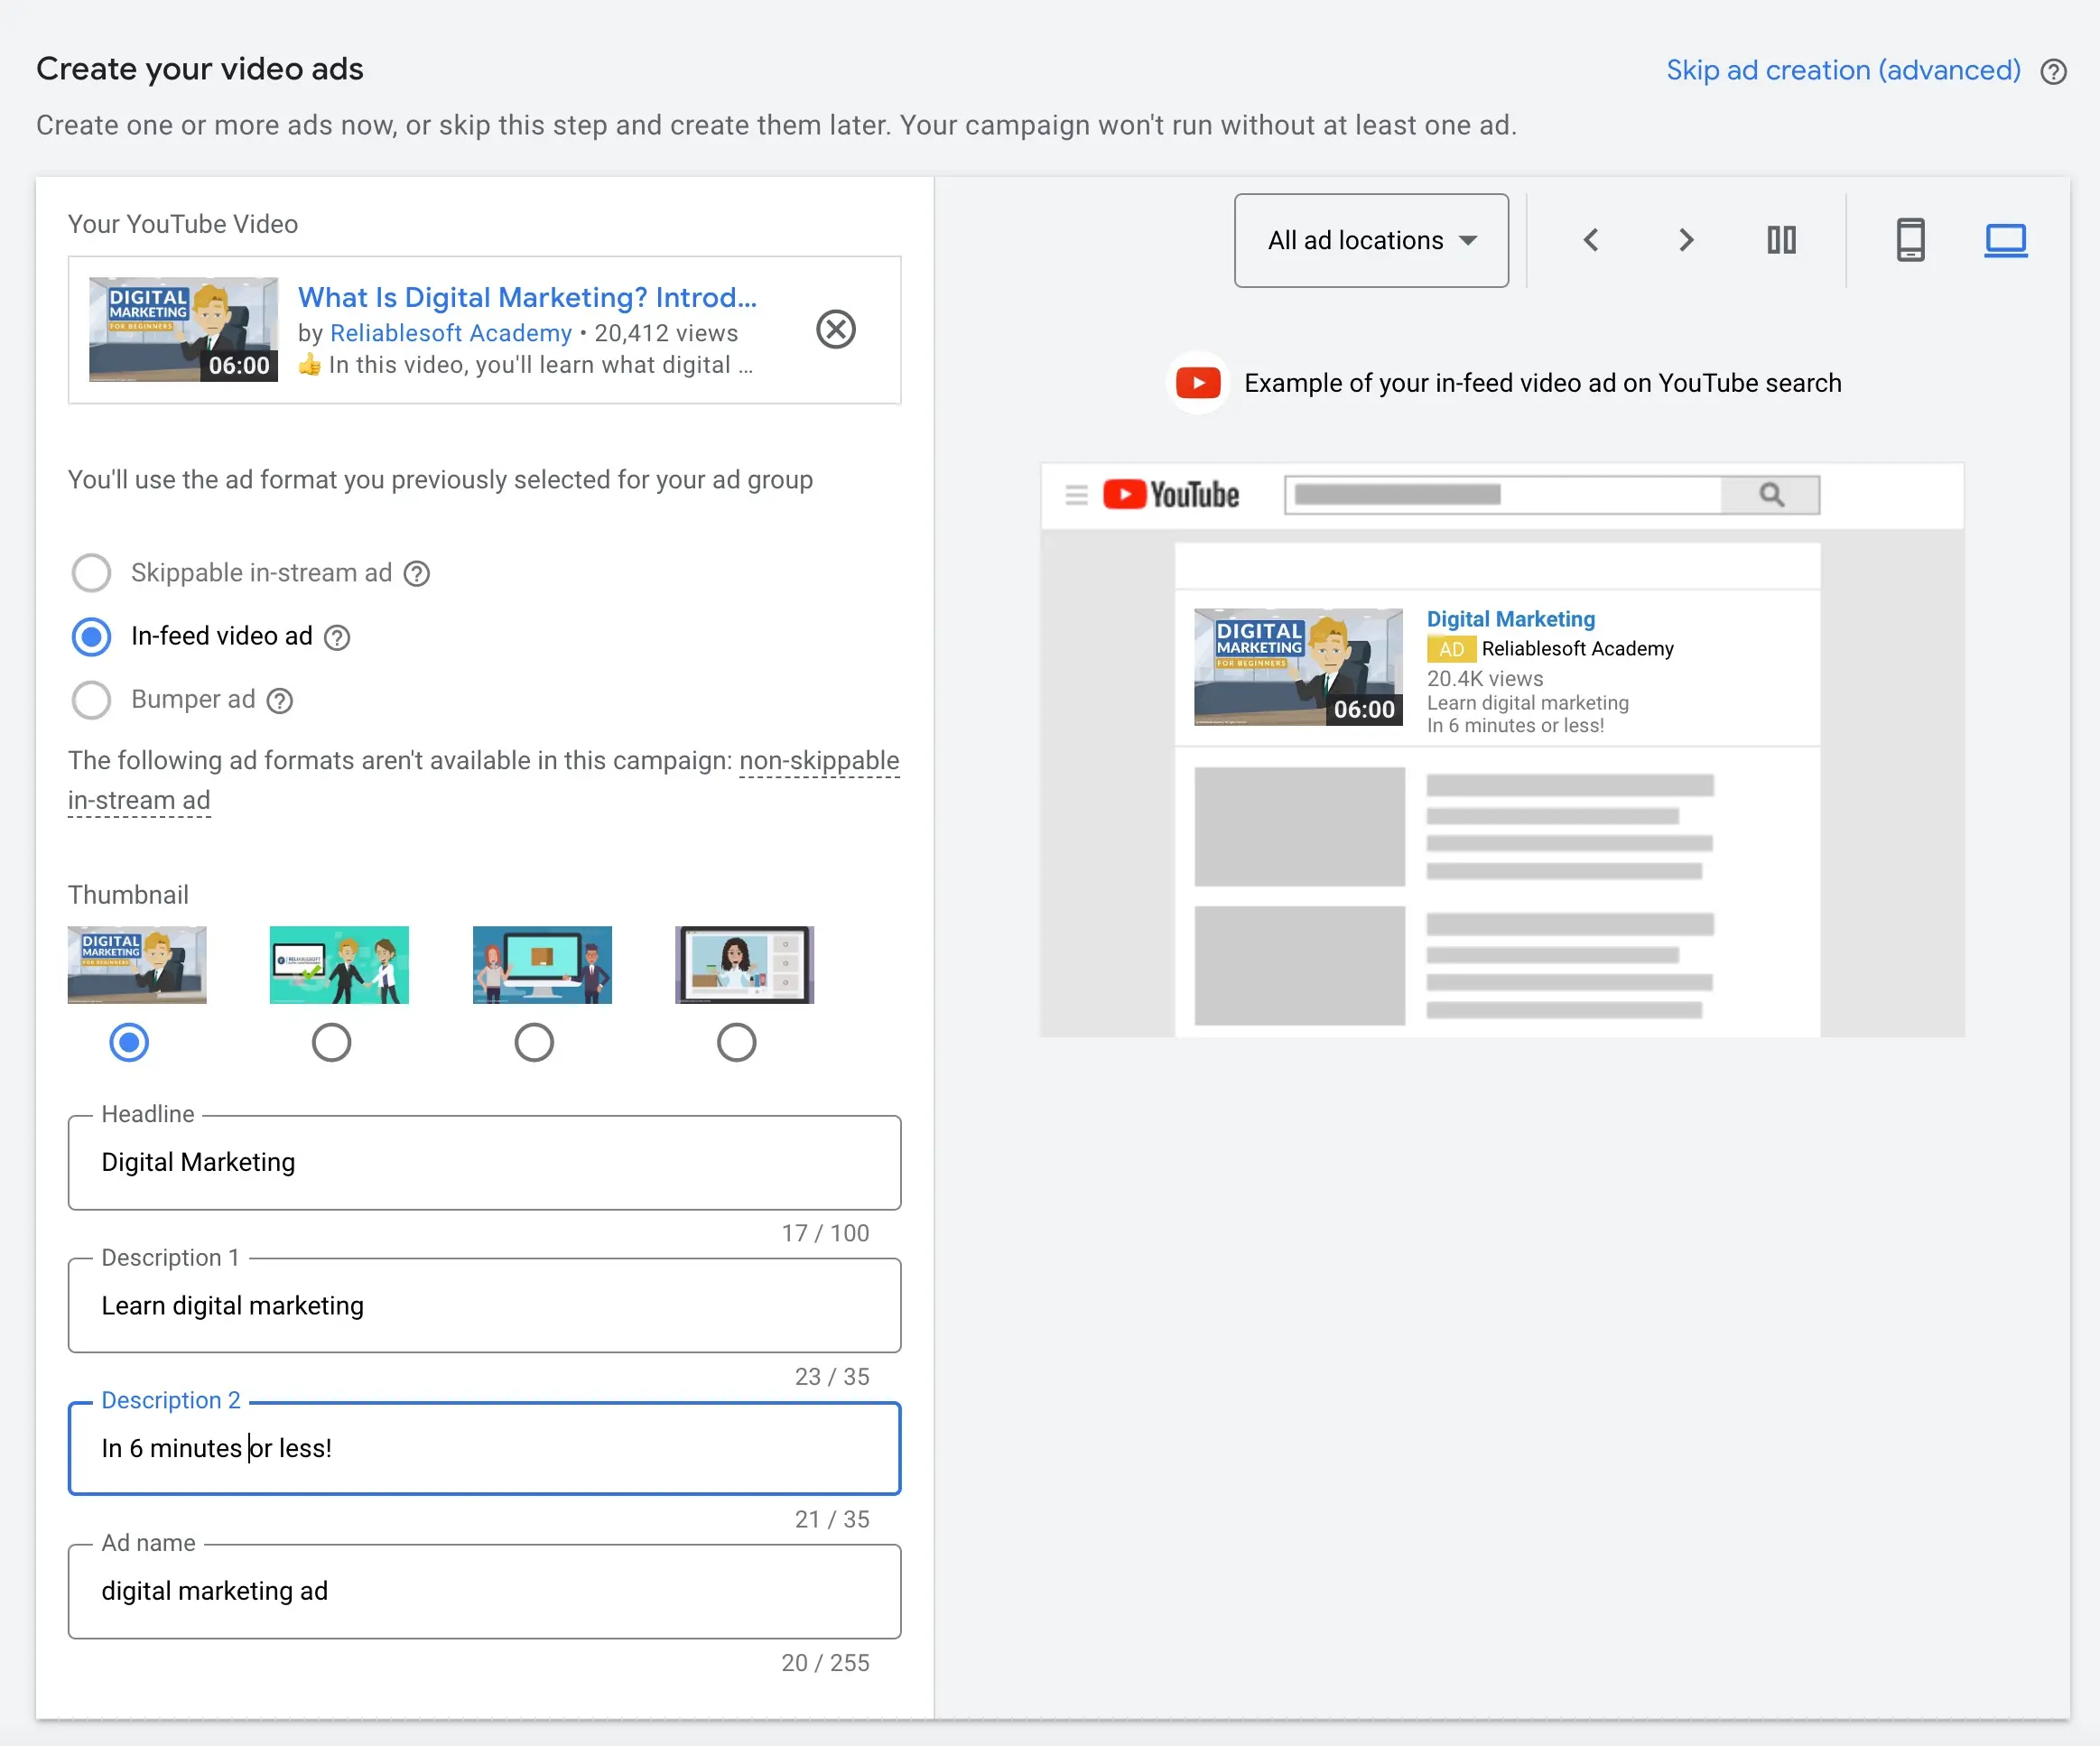
The next step is to select “In-feed Video Ad” as the ad format, choose a thumbnail, and define a headline and two descriptions for your ad.
What is important is to look at the different ad previews (on the right) to examine how your ads will look on desktop and mobile and adjust your headline accordingly.
Ideally, you should use a short headline that will not be cut on mobile.
If you want to test different variations of headlines and thumbnails you can create one more ads with the same video and run them in parallel. You can then pick the winner based on performance.
Set a bid value
The last step is to specify what is the maximum amount you are willing to pay for someone to view your ad.
Based on your audience settings and budget, YouTube will suggest an amount to use for max performance.
You can choose to go with their suggestion or use a different amount and examine the “Your Estimated Performance” widget to see the impact of bids on campaign performance.
While the values given are estimates and they may vary from actual results, it’s a good way to see what kind of results you can expect from your current budget.

When ready, click the CREATE CAMPAIGN button to start your first video campaign!
Tips for Optimizing a YouTube Advertising Campaign
Once you start your campaign, leave it running for a few days (ideally 2 weeks) and start making data-driven decisions by analyzing your ad's performance.
We will do this by reviewing several reports available in Google Ads.
1. Review the Videos and Video Analytics Reports
The first one is the Videos report, which is available under VIDEOS in the Google Ads menu.
This report shows you a number of useful metrics, the most important are:
Impressions - how many times have your ads been served.
Views - how many people viewed at least 30 seconds of your video or interacted with your ads. This is equivalent to "Interactions or Clicks" in non-video ads).
View rate - the percentage of people that viewed your video after seeing your ad. This is equivalent to "Click-Through-Rate" for pay-per-click ads.
Average Cost Per View (CPV) - how much you paid for each video view.
Earned likes, earned views, earned subscribers - actions that users performed in a period of 7-days after viewing your ad. You are not charged for these actions.
For example, if a user subscribes to your channel within 7-days of viewing your ad, it will show up as Earned Subscribers.
For maximum results, you should closely monitor the Earned actions. If these numbers are increasing over time, it means that your ads are successful. People are coming back to your channel and watching more videos increasing your views and subscriber count.
You should try increasing your budget to reach more people and increase your earned actions.
If on the other hand, you find that these numbers are low, you should consider changing your video ads because it seems that people don’t find the content interesting enough that they come up to your channel to consume more content.

The second report to review under VIDEOS is the ANALYTICS report.
The report has two tabs:
- Ads data - Ads data shows how your video was seen and how it performed when it was promoted as an ad.
- Organic data - Organic data shows the organic performance of your video.
To make a meaningful comparison, the video you promote in the ad should already have an organic reach. If you’re promoting a brand new video, then this report is not very useful to you.
If your video has existing data, you can compare the audience retention on both reports. If the organic audience retention is much higher than the paid ads, then you should revise the audience targeting settings for your ads.
Low retention means that people are not watching your video, and this is a signal that you’re showing it to the wrong people.
2. Review the Audiences Report
The next report to review is the Audiences report. This report shows how your ads are performing for the different demographic characteristics.
You should analyze the VIEWS and ENGAGEMENT RATE values for the various demographic groups (especially the AGE) and adjust your targeting options based on the groups that performed better.
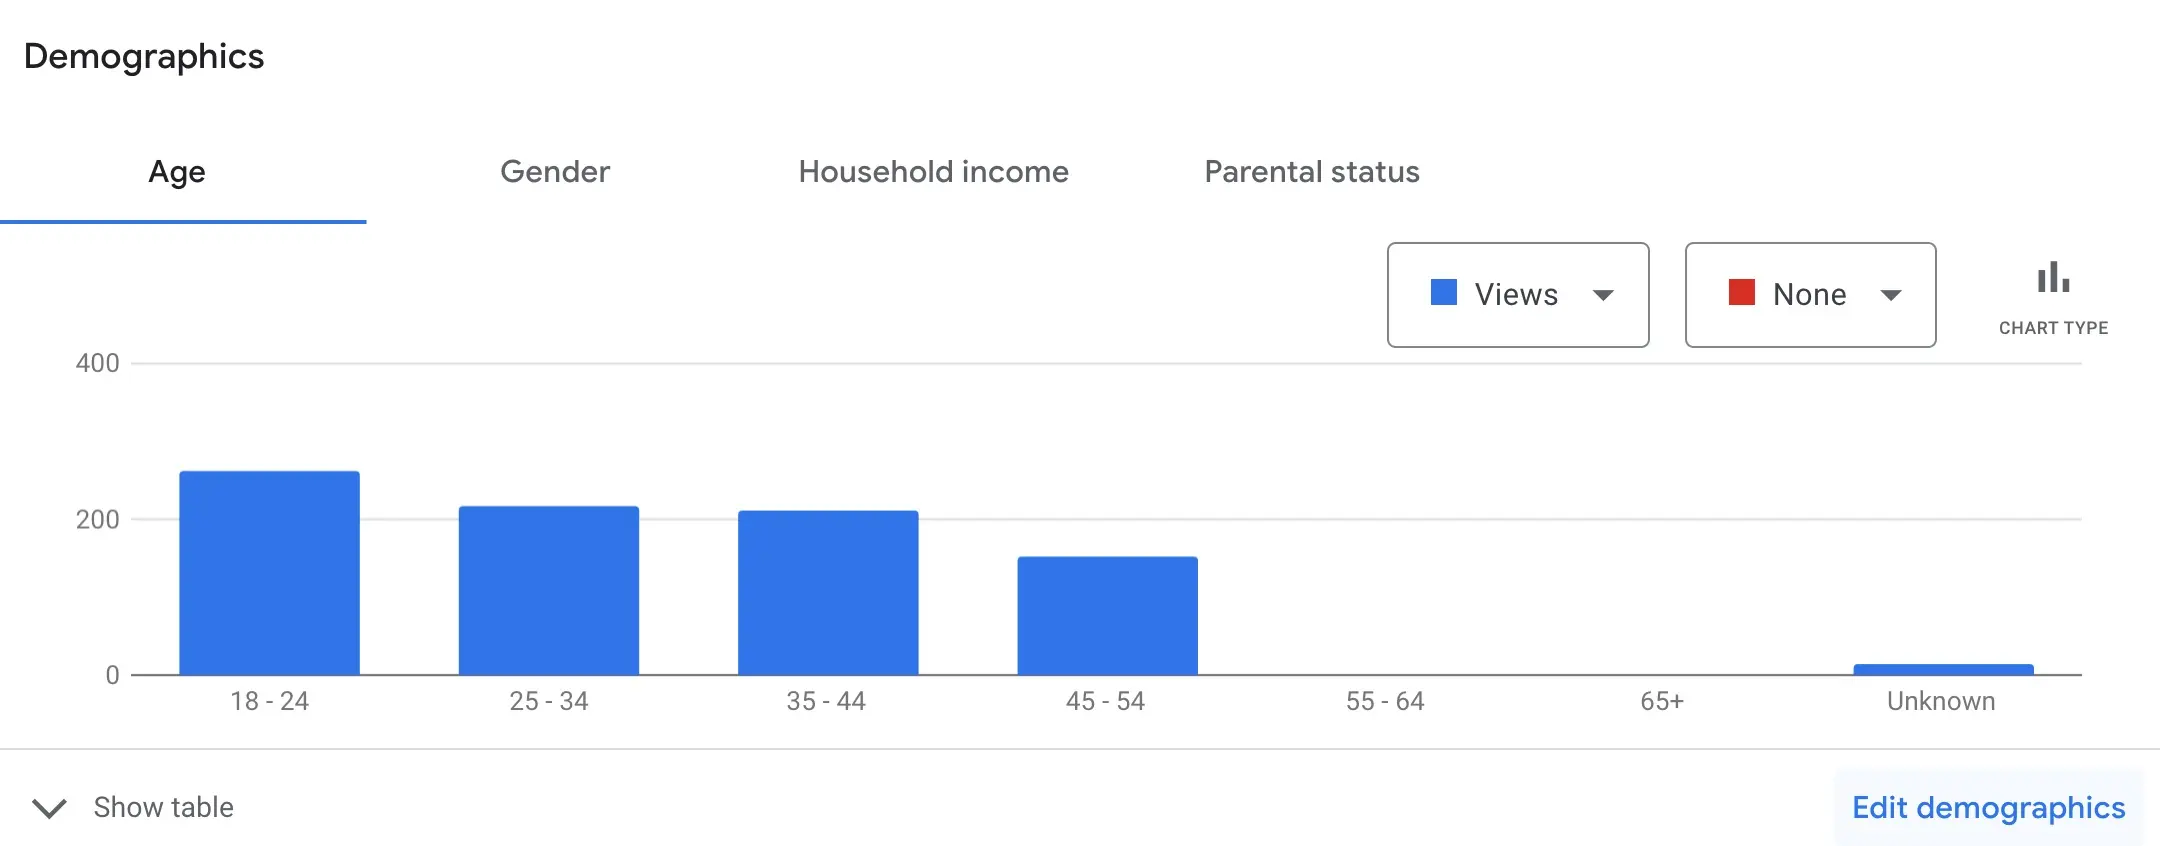
For example, if you see that a particular age group generates fewer views compared to other groups, you can exclude it from your campaigns so that the budget is allocated to the age groups that can produce better results.
3. Review the “Where ads showed” Report
Another useful report to examine is the “Where ads showed” report. This report shows you exactly the places (channels and websites), your video ads were shown.
You can access this report under the CONTENT menu.
Click on the Impr. column to sort the results by Impressions and then examine the VIEW RATE column.
Spot the placements with the lowest VIEW RATE values and consider excluding them from your campaigns.
To remove a placement, click the checkbox next to the placement name and select EXCLUDE FROM CAMPAIGN from the EDIT menu.
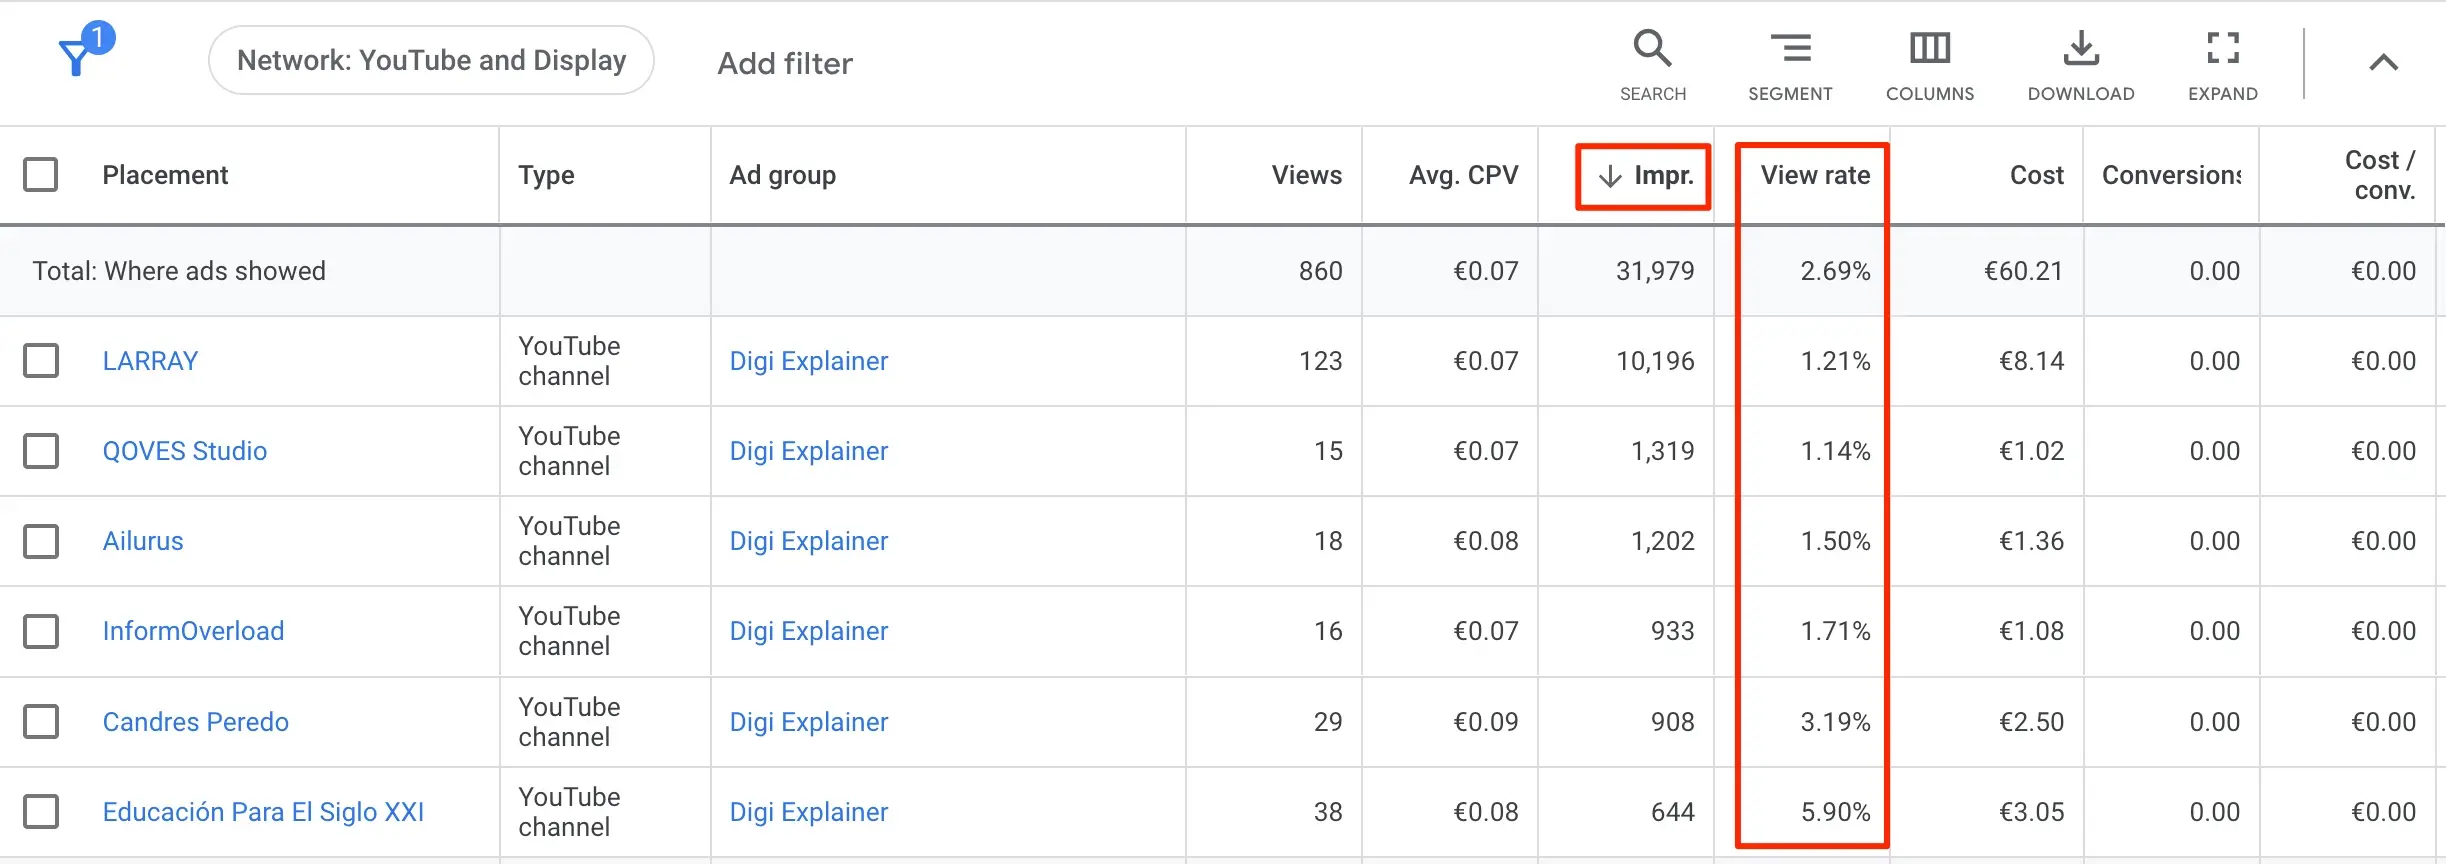
By removing placements with a low view rate, you can ‘force’ the system to find better placements for your ads and thus improving the overall performance of your campaigns.
4. Review the Devices Report
Another report to look at is the Devices report. This report shows you how your campaigns are performing on different devices.
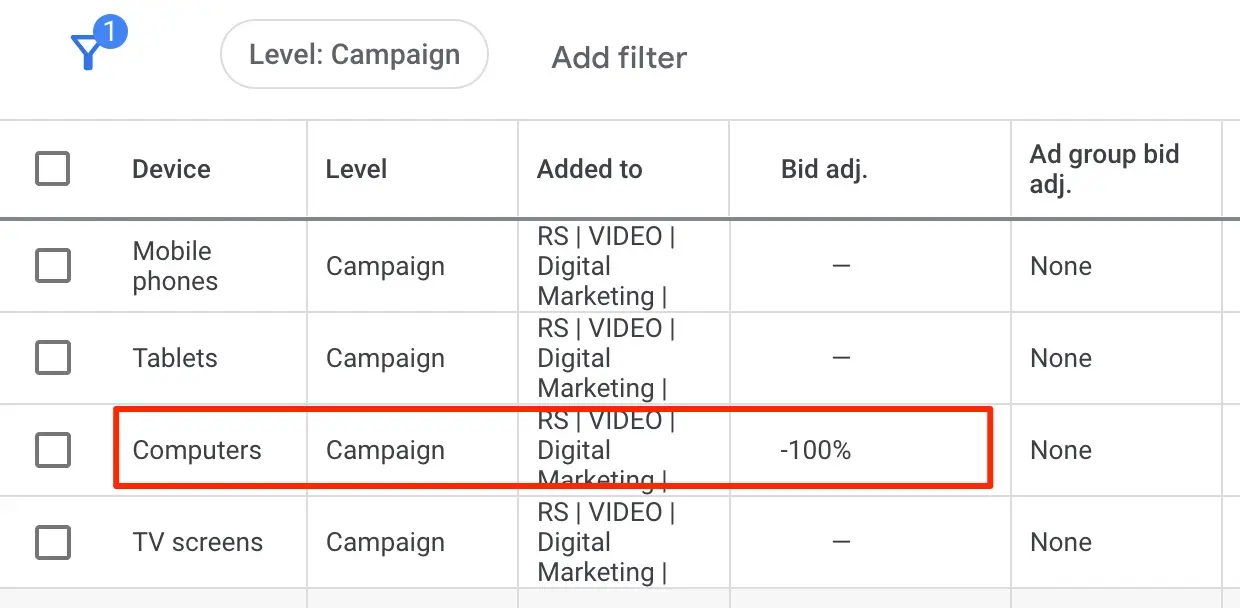
It is likely that most of the impressions and views are coming from mobile devices. If this is the case, you can consider lowering the bids for other devices or excluding them from your campaign by setting a -100% bid decrease.
You can then go back, edit your ads and optimize them fully for mobile.
5. Recommendations Report
When you click the “Recommendations” option from the left menu, you can get ideas on improving your campaign’s performance. The suggestions come from the Google Ads AI system that looks into several settings related to your campaigns.
You need to know three things about the “Recommendations Report”.
- To get recommendations, your ads should be running for a number of days, so this might not be available from day 1.
- Don’t blindly follow all recommendations. Before accepting a proposed change, ensure it matches your campaign goals.
- Try to keep your campaign performance score as close to 100% as possible. If a recommendation is invalid, click the three dots menu and select DISMISS. This will remove the recommendation and its score.
Why Use YouTube Ads?
When you create a new YouTube channel or publish a new video on YouTube, you have two options.
The first option is to wait for your video to rank organically on YouTube and get the attention it deserves. The second option is to use paid advertising (e.g., YouTube ads) to position the video in front of the right audience and earn views or subscribers.
If you choose the first option, you must master YouTube SEO and be patient, as organic ranking on YouTube takes time. It’s a great strategy and one that can generate long-term results, but if you’re looking for a faster option, it’s not the best method.
If you want to attract as many viewers as possible to your video as quickly as possible, paid ads are your only option.
These are the pros and cons of using a paid campaign to increase video views are:
Pros
- Can generate video views and win social proof. Videos with many views are more likely to be viewed by others than videos with fewer views.
- Audience targeting can be very specific and this allows you to show your videos to people that are likely to watch the video, like it, and become subscribers.
- You can get detailed statistics of how your campaigns perform so you’ll know how many people watched the video, how many subscribed, etc.
Cons
- It’s not free. Although I’ll show you techniques to lower your campaign costs, you’ll need a budget.
- The video you’ll be promoting must be good enough to engage users. This campaign type works for all niches but not for all videos.
Learn More
Best YouTube Courses - Master YouTube marketing with a dedicated course. We've reviewed the top courses for the best possible learning experience.
Online Video Advertising Campaigns - The official guide from Google for growing your business with YouTube ads.
Best Google Ads Courses - The best training courses to become a certified Google Ads expert.
