Advertising on Facebook is one of the most effective forms of digital marketing. The platform has billions of active users, allowing businesses from all industries to reach their target audiences.
Running Facebook ad campaigns isn’t easy. There are many variables that you need to get right to have success. This is why companies hire Facebook experts.
Facebook specialists know the ins and outs of Facebook marketing and how to generate the best results.
In this post, you'll learn the steps to follow to become a Facebook specialist. It's the same process we use to train new employees who join our Facebook Marketing team.
What Does a Facebook Ads Expert Do?
Facebook Ads experts are responsible for building and monitoring marketing campaigns on the Facebook Advertising platform.
They can work for a single brand or at a digital marketing agency where they handle multiple clients.
Here are some of the important responsibilities of a Facebook Advertising expert:
- Planning Facebook Ad campaigns
- Creating graphics and ad copy
- Analyzing campaign performance and making optimizations
- Installing tracking pixels
- Working with other marketers to optimize landing pages
- Staying up to date with the latest Facebook Advertising best practices
How To Become a Facebook Ads Specialist
These are the 10 steps to follow to become a Facebook ads specialist.
- Build your Facebook ads skills and get certified
- Learn how to use Facebook business manager
- Understand how Facebook sales funnels work
- Learn how to configure Facebook events and custom conversions
- Understand custom and lookalike audiences
- Study the different ad placements and Facebook Ad types
- Learn how to use a graphics design tool
- Learn how to do competitor analysis
- Learn how to use the Facebook ads reporting tool
- Stay informed about updates to Facebook Ads
1. Build your Facebook ads skills and get certified
The first step to becoming a Facebook Ads specialist is to learn Facebook Ads and to build the skills needed to carry out the various responsibilities of the role.
Some of the important skills you’ll need to build include:
- How to create a winning ad strategy
- Knowing what types of ad formats to use in different situations
- Selecting the best audience for campaigns
- How to design ad creatives that capture users’ attention
- Using engaging content to increase your reach
- How to set up a Facebook Shop catalog
The best way to begin learning about Facebook marketing is through online Facebook Ads courses.
With a good course, you’ll have all the important topics you need to know compiled together in a single resource. As a result, you won’t have to worry about finding what you should study next.
A good option is the Facebook Ads Course from Reliablesoft. The course includes 12 lessons consisting of 100 pages of material, video tutorials, and checklists you can use for your own processes.
It covers everything you need to go from a beginner to a knowledgeable Facebook marketer.
As you learn about Facebook marketing, you also want to get certified. Many courses will include a certification that you can earn upon completion.
Certifications validate your skills and knowledge and are quite beneficial throughout your digital marketing career. You can use your certifications to stand out from others when looking for work as a Facebook Ads specialist.
There are several Facebook Ads certifications you can receive. The most popular are:
2. Learn how to use Facebook business manager
The next step is to become a Facebook Business Manager expert.
Facebook Business Manager is the platform for managing your Facebook ad campaigns and business pages. You can add multiple ad accounts to the Business Manager for an organized way to manage accounts for various clients.
The Ads Manager tool in Business Manager is what you will use to design your ads and create campaigns.
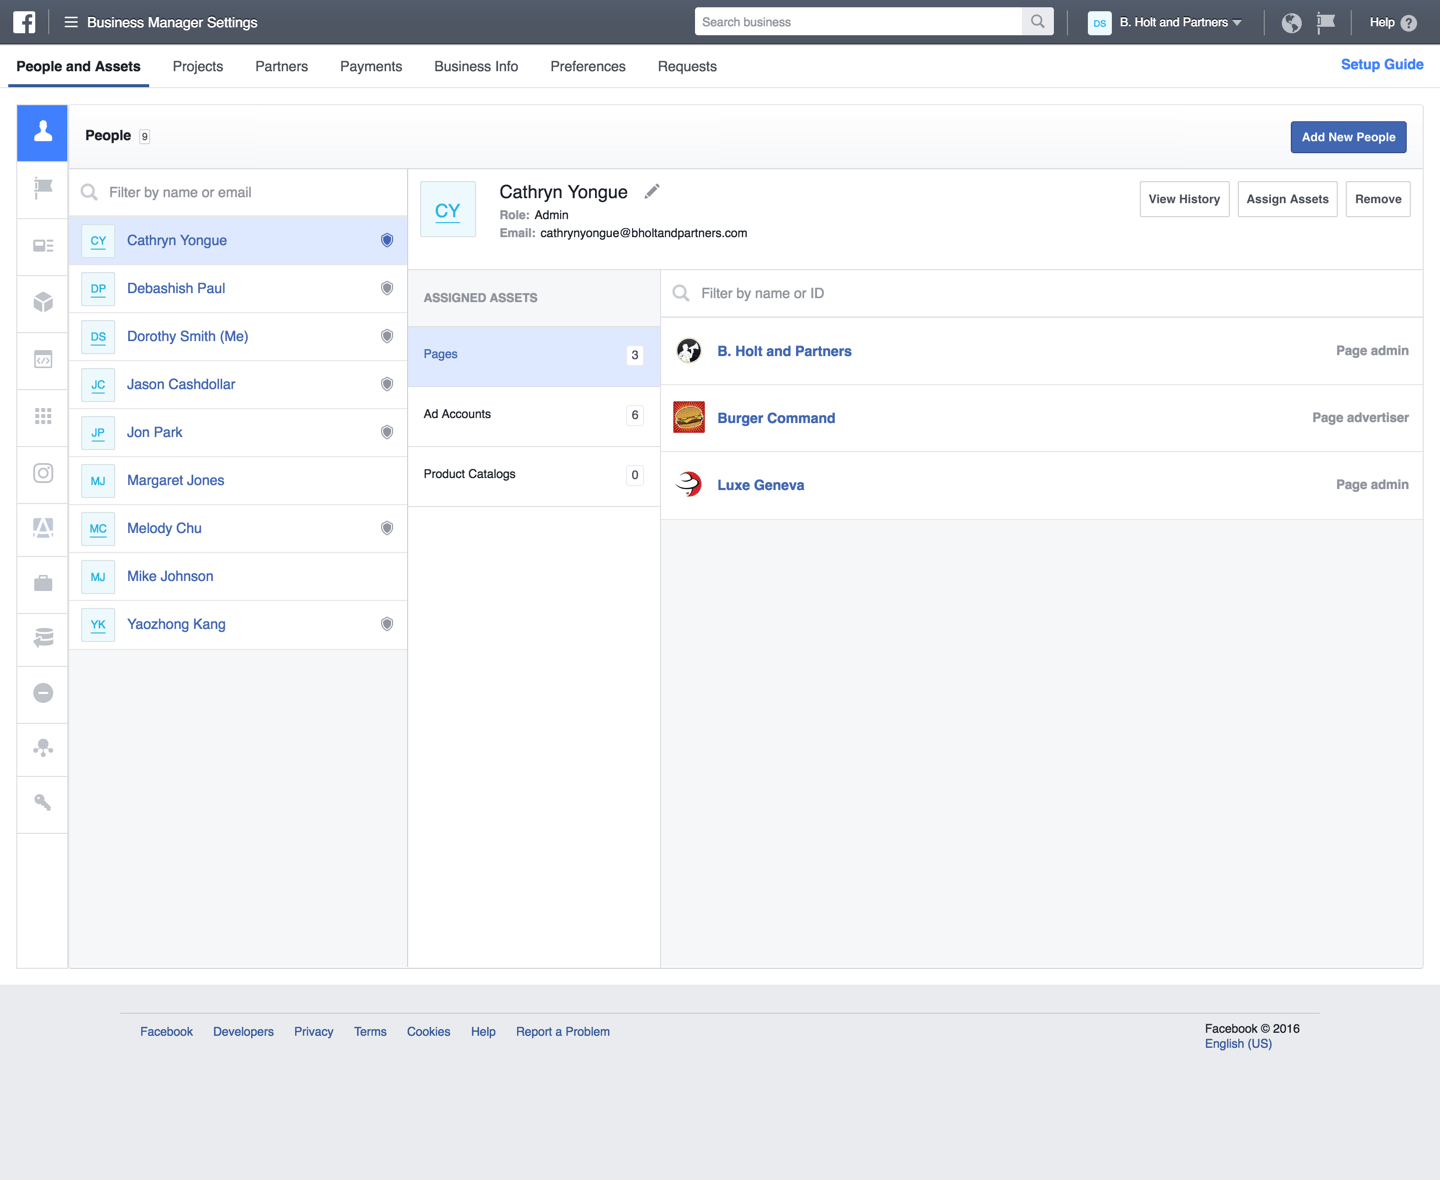
As a Facebook Ads specialist, you’ll need to know how to add business pages and optimize them for maximum engagement.
You’ll also need to know how to control user access for different parties within the Business Manager.
Facebook Business Manager allows you to add team members so that you can collaborate inside the system.
Each team member needs to be assigned a permission level that determines what they can see and what actions they can take.
Setting up Facebook Pixel
Facebook Business Manager is also where you will create and manage your Facebook Pixels. These pixels are pieces of tracking code that are added to your website.
When a pixel is installed on your site, Facebook can gather data on your visitors and their actions.
This allows Facebook to calculate important performance metrics for your ads. For example, the Facebook Pixel can track every sale to give you a conversion rate and total revenue generated from your ads.
The Facebook Pixel is also useful for remarketing as it can track exactly what pages and products a person visits.
There are other important parts of Business Manager that you’ll need to master including:
- Creating a calendar for posts
- Setting up a product catalog for Facebook Shop
- Using the Inbox to communicate with users through Messenger and Instagram Direct
3. Understand how Facebook sales funnels work
Similar to other forms of digital marketing, sales funnels play an important role in Facebook Advertising.
People are unlikely to buy from your business on the first interaction. Therefore, it is necessary to guide them through the purchasing journey.
Funnels divide users into various stages based on their current relationship with your business.
People who engage with your business for the first time are at the top of the funnel. The more people engage with your business, the further down the funnel they go until eventually becoming a customer.
Facebook sales funnels use the following stages to guide an individual from prospect to customer:
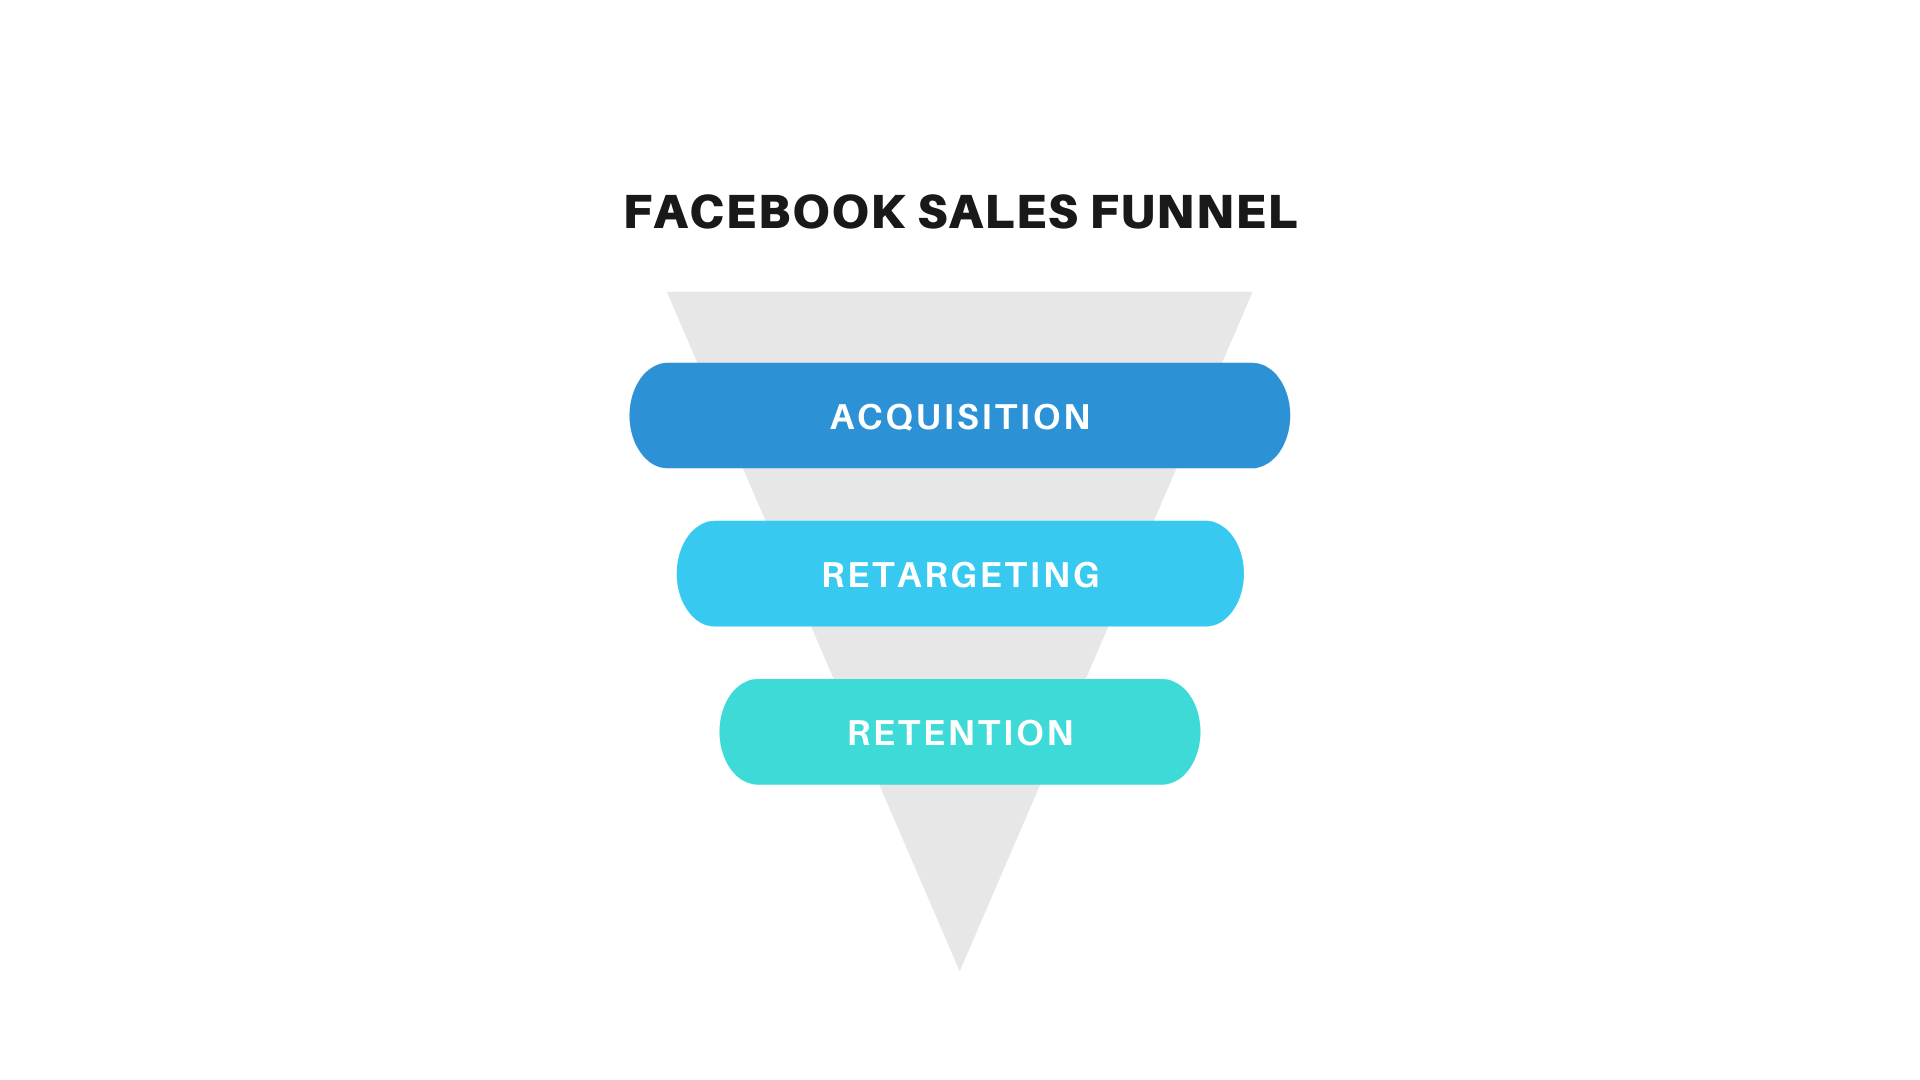
Acquisition - During this stage, you find new audiences to target with your campaigns. You then use your ads and content to warm them up for the later funnel stages.
Retargeting - During this stage, you market to people who have moved through the acquisition stage but have not resulted in a sale. This can include people who saw your ad but took no action or who clicked through to your website before eventually leaving. This stage aims to generate more sales with less marketing spend than the previous stage.
Retention - During this stage, you use your ads to target existing customers. Already having data on this audience, you are able to promote highly targeted offers.
4. Learn how to configure Facebook events and custom conversions
Facebook Advertising experts must know how to set up custom events and conversions to track the performance of their campaigns better
The Facebook Pixel automatically tracks some important actions users take on your site, but not all. Tracking the rest requires a custom configuration.
Below are some of the standard pixel events that are automatically tracked:
- Add payment info
- Add to cart
- Add to wishlist
- Contact
- Complete registration
- Initiate checkout
- Lead
- Purchase
- Search
- View content
You'll need to know how to create a custom event to track an action that isn’t part of the standard tracking events.
You can configure your custom events to add users to custom audiences automatically. However, you cannot use custom events for optimization or attribution unless the event is mapped to a custom conversion.
To create a custom conversion, you must go to Manage Business > Events Manager.
Find the pixel you use and select Custom Conversion from the Events Manager menu.
Click Create a Custom Conversion. Add a name and select a data source. This will be your pixel unless you are tracking an offline event.
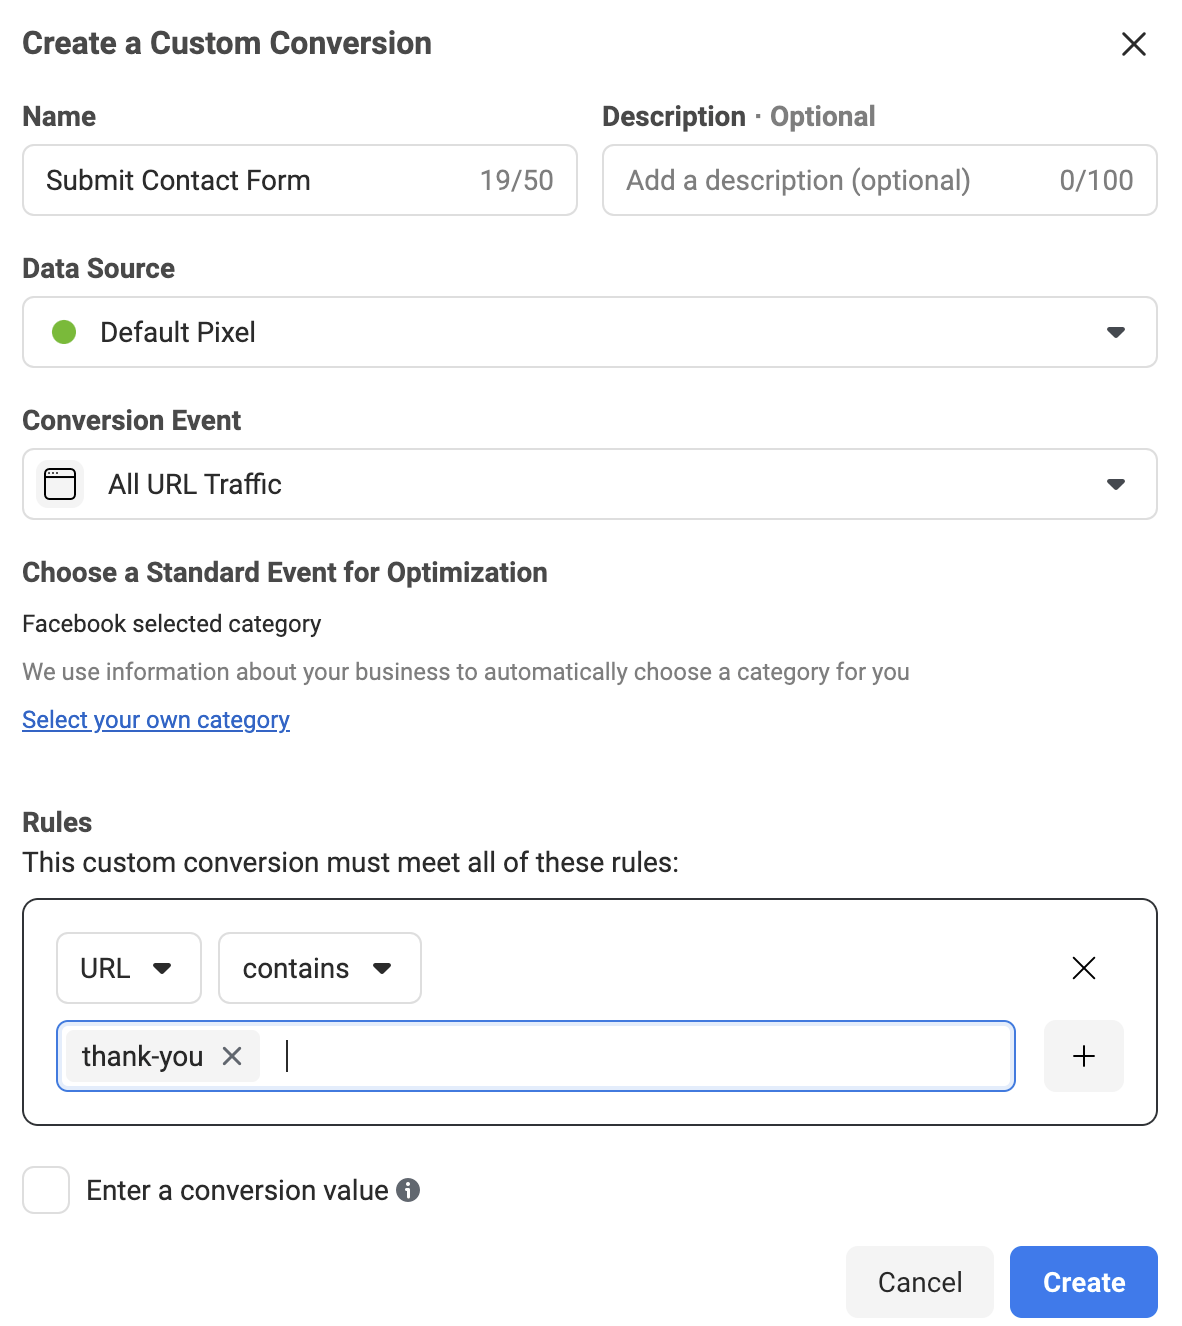
You’ll then need to select the conversion event that you are looking to track. This can be any of the standard events, or it could be a custom event.
5. Understand custom and lookalike audiences
Facebook gives marketers all sorts of options for defining the audience for an ad campaign. You can target people based on location, age, interests, gender, etc.
You’ll need to understand how custom and lookalike audiences work to target your audience in even more detail.
Custom audiences
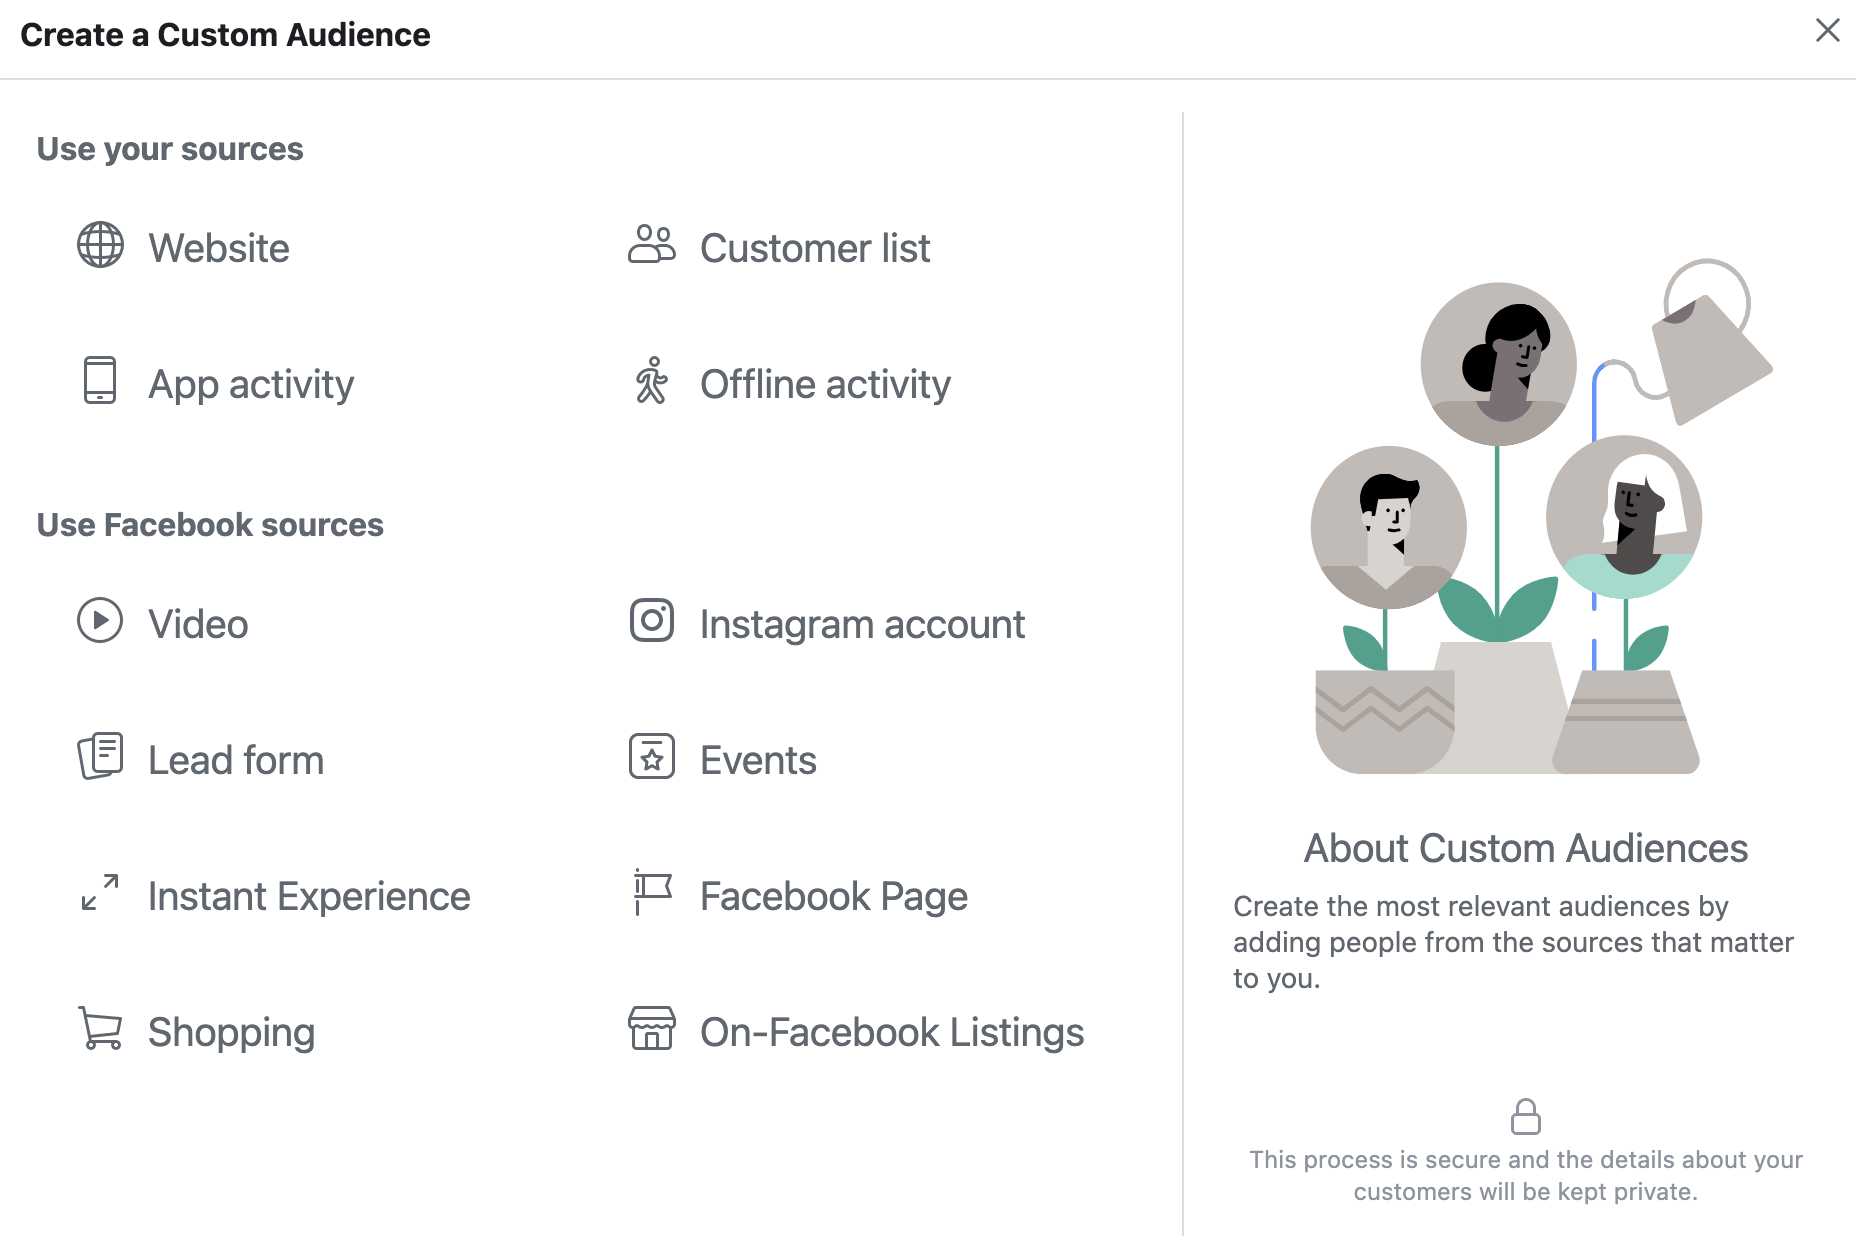
With a Facebook custom audience, you can create a precise list of people to target with your ads. You can use several different data sources to create your custom audiences, including:
- Website visitors: You can add all website visitors or you can define particular segments of your visitors, such as people who visit a certain page or people who visit multiple pages.
- Customer list: You can upload a list of email addresses for previous customers. Facebook will match the emails to customer accounts to know who to target for ads.
- Engagement: You can add anyone who engages with your business on Facebook (comments, likes a post, etc.) to a custom audience.
Lookalike audiences
Lookalike audiences give you the ability to market to a large base of users who share similarities with your target audience.
You can create a lookalike audience by uploading a source audience.
Facebook uses machine learning to scan the characteristics of the users in the source audience. It then finds other users with similar characteristics and adds them to your lookalike audience.
You can create source audiences using the data used for customer audiences (website visitors, list of previous customers, etc.).
6. Study the different ad placements and Facebook Ad types
Facebook Ads can appear in various places across Facebook’s web properties.
When you create a campaign, you can have Facebook select placements for you by selecting Automated Placements.
If you want to choose your ad placements, you select Edit Placements on the ad settings page.
You can then choose to enable or disable the following platforms:
- Audience Network
- Messenger
Beneath the platforms is a list of specific placements you can choose to enable or disable. Some of the options include:
- Facebook News Feed
- Instagram Feed
- Instagram Stories
- Facebook Right Column
- Messenger Inbox
Along with placements, you’ll also need to understand the different Facebook ad formats.
Here are some of the most important types of Facebook ads you’ll need to know how to use:
Image ads - This is the simplest form of Facebook Ad and contains an image, headline, description, link, and call to action button. You can use image ads for all kinds of Facebook Ads placements.
Video ads - With this ad format, you can showcase your product or service using a short-form video. Video ads can appear in various placements throughout Facebook’s properties. Each placement allows for different video lengths and aspect ratios. As a Facebook Ads expert, you’ll need to know how to make videos that capture people’s attention quickly.
Carousel ads - This ad format allows you to show up to 10 images or videos in the same ad. Each image has its own copy, link, and call to action. Users can scroll the tiles by swiping on their phones or clicking the arrows on a desktop. These ads are a great choice when you want to showcase multiple products or different features for the same item.
Slideshow ads - This ad format features video-like ads that use sound, motion, and text to connect with the target audience. Images in the slideshow automatically shift to create an immersive experience. Slideshow ads are an effective option for marketers looking to create visually engaging ads without the high production costs of recording a video.
Collection ads - These ads were designed specifically for mobile users. They contain a cover image (or video) followed by multiple products. When someone taps on the ad, it becomes full screen, and they can scroll through more products.
Dynamic product ads - These ads are used to remarket to people who have visited products on your e-commerce site. Once you set up the campaign, the ads are automatically generated to show users products specific to their interests.
7. Learn how to use a graphics design tool
Facebook Ads specialists need to know how to use graphic design tools.
Visuals are the core of Facebook Ads, as every ad format needs an image or video.
You can save your images and design elements in a single place. This allows you to work more efficiently as you can simply reuse these elements as needed.
There are plenty of graphic design software options that are easy to learn. Some popular choices include:
- Canva
- Crello
- Pixelied
8. Learn how to do competitor analysis
Analyzing the competition is a useful way of improving a Facebook Ad campaign. By knowing what competitors are doing, you can create ads that stand out.
You can also learn by seeing what they place the most focus on. This helps inform you which areas are important to customers so that you can optimize your own campaigns.
The Facebook Ad Library provides a database of all the ads running across the Facebook Advertising platform.
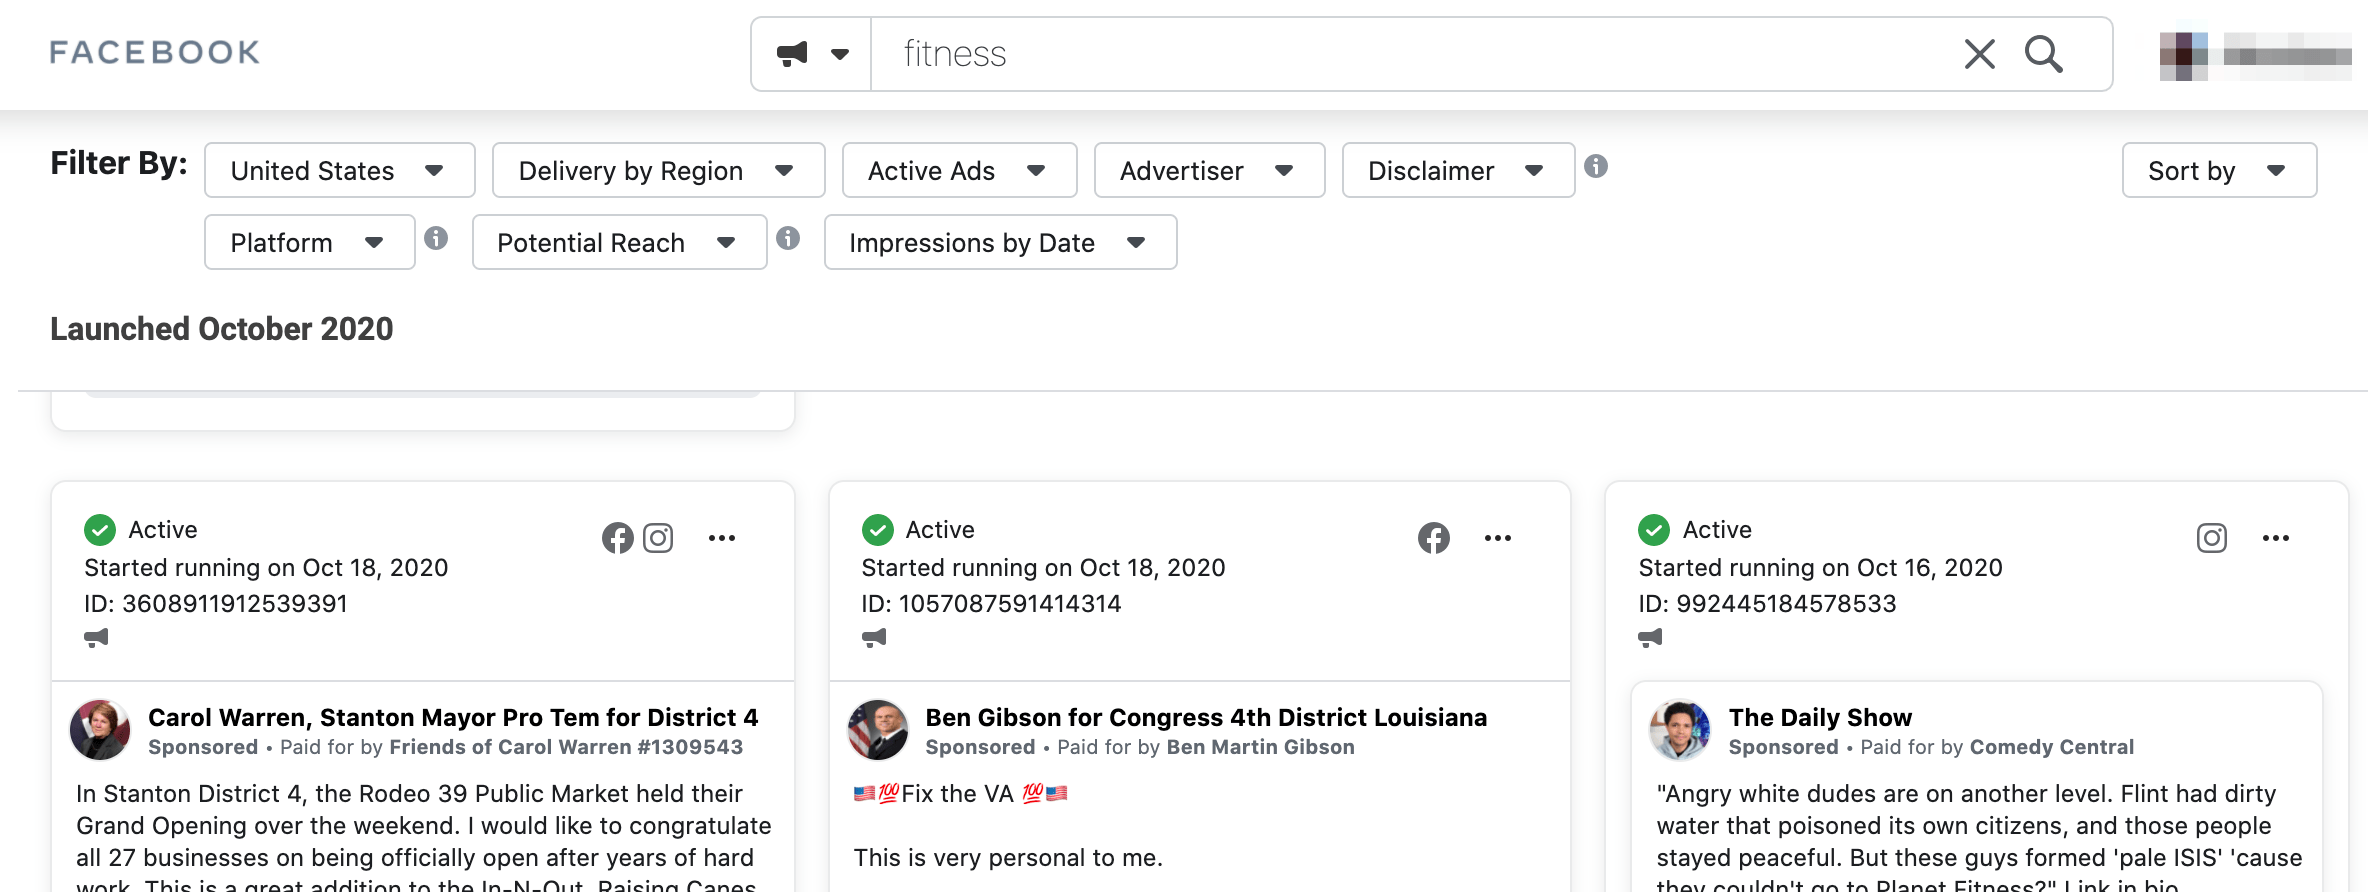
You can use the Ad Library to see exactly what ads a competitor is running. This includes placements, images, copy, links, and when the campaign started.
Other tools like Semrush help you spy on your competitors further and see your competitor's ads.
These tools allow you to see where competitor traffic comes from, how much engagement their social profiles get, how much they spend on different advertising channels, and more.
9. Learn how to use the Facebook ads reporting tool
The Facebook Ads reports give you all the information you need to monitor the performance of your campaigns.
As a Facebook Advertising expert, you need to know how to analyze the data to see where you are succeeding and where you need to improve.
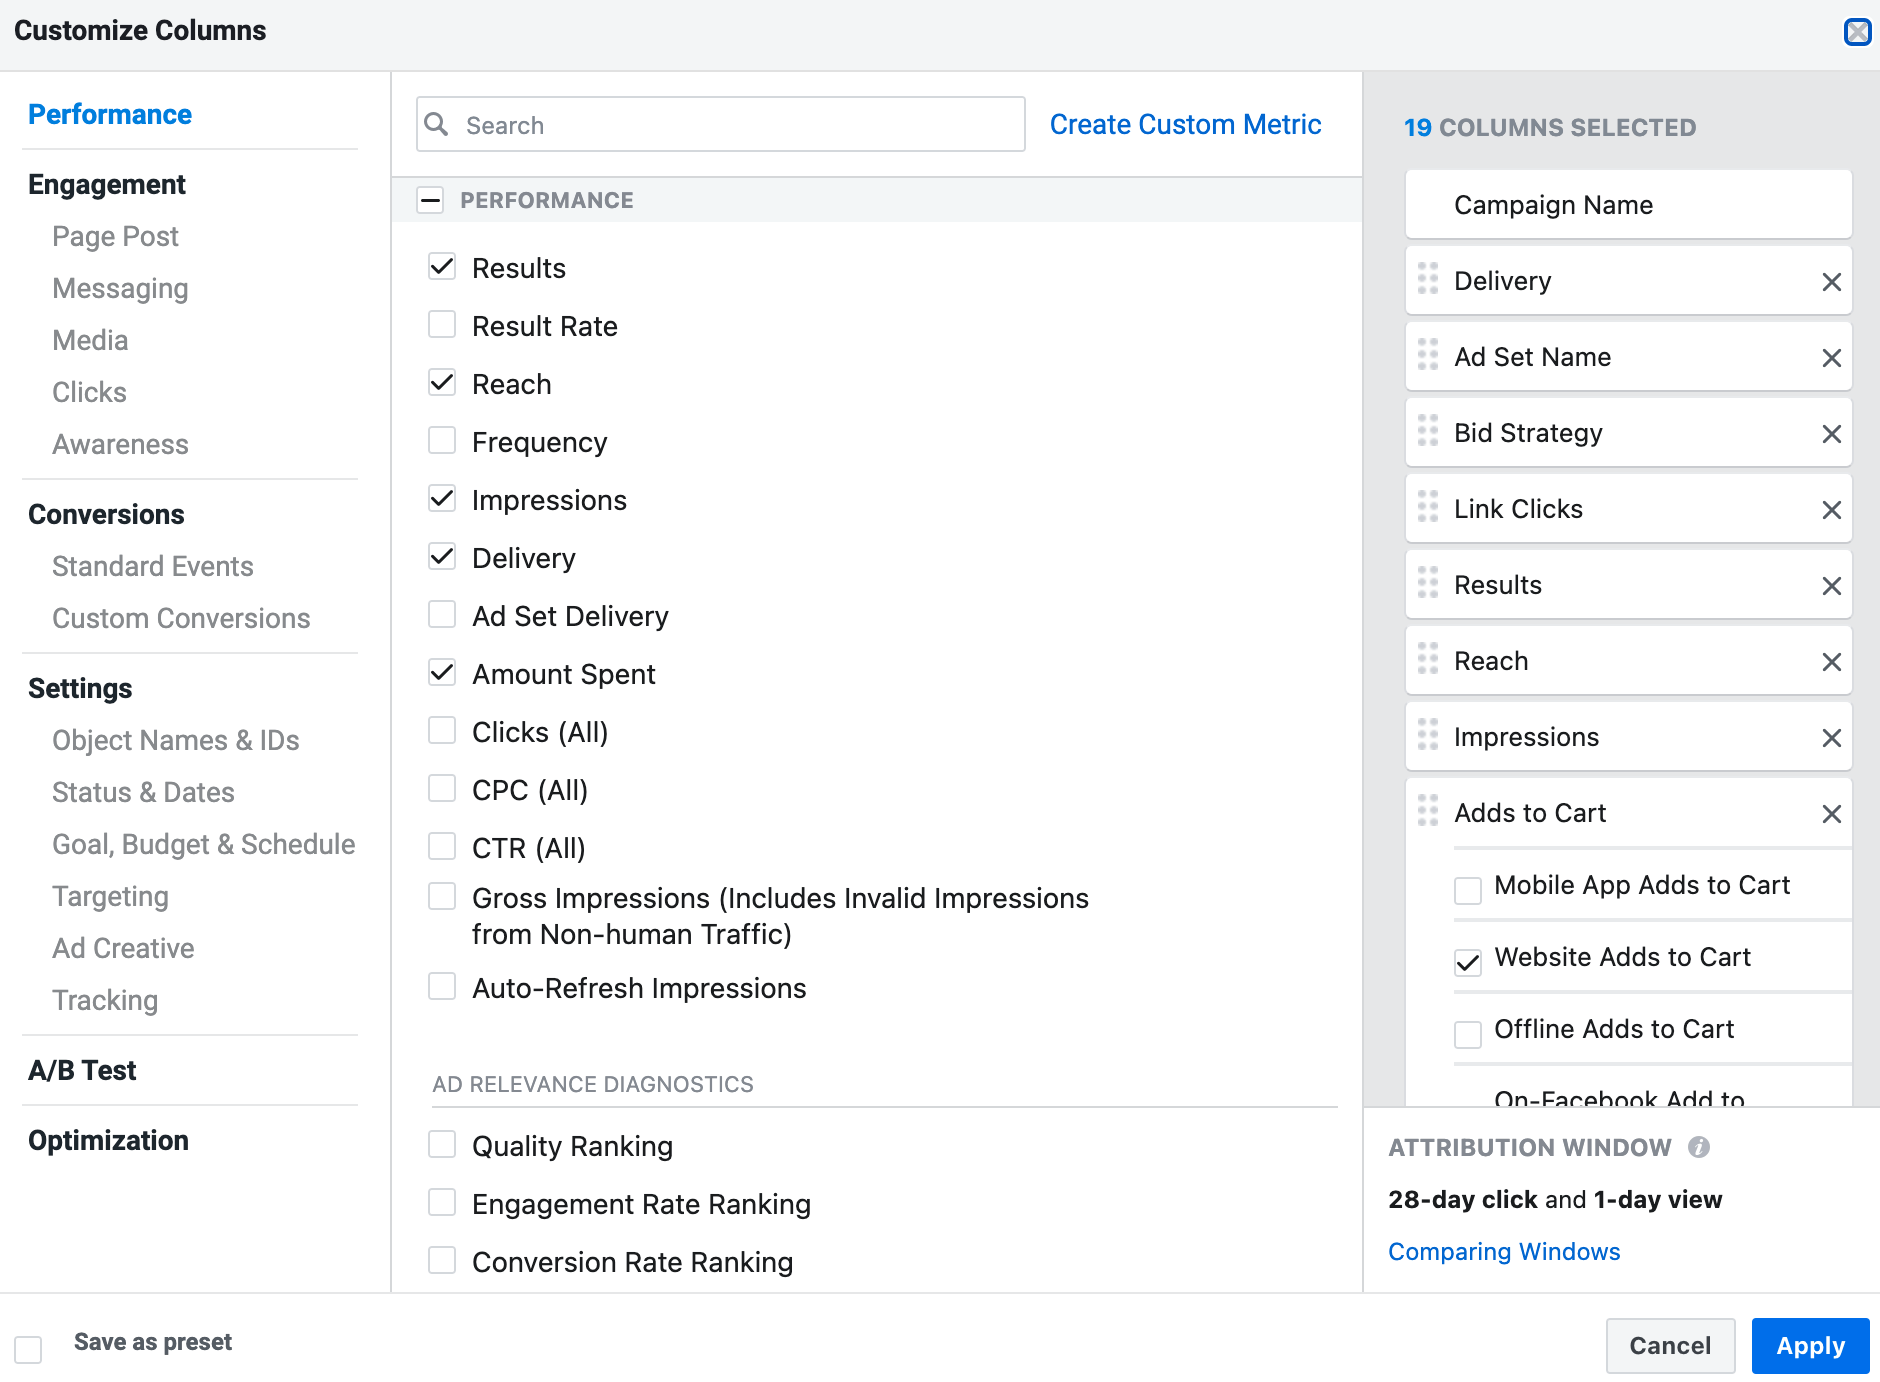
You can customize the ad reports to include the metrics most meaningful to your business.
Here are some of the most important metrics to track in your reports:
- Click-through rate: This shows the percentage of people who click the ad after seeing it.
- Link clicks: Measures the total number of times someone clicks on an ad.
- Amount spent: Mesauses the campaign’s total cost for impressions and clicks.
- Impressions: This shows the total number of times your ad is viewed.
- Reach: Measures the number of people who have seen your ads.
- CPC: Measures the average amount paid each time someone clicks on your ad.
After you’ve created a report, you can export the data to use outside of Facebook.
You can also automate the process of generating reports. To do this, you must create a new report and select Schedule Email when saving the report.
You can select how often you want to receive the email, and the report will then be created at recurring intervals.
10. Stay informed about updates to Facebook Ads
It is important to stay up to date with the latest changes in Facebook Advertising and digital marketing as a whole.
Doing so keeps you familiar with current best practices and increases your ability to continue to drive positive results.
The Facebook for Business Newsletter is a great place to stay up to date with the latest changes in the world of Facebook marketing.
You can use this page to sign up for the newsletter for free. Once subscribed, you’ll receive regular updates directly to your inbox.
Another great way to stay informed is to follow top websites related to Facebook marketing. These sites post content regularly and are great for expanding your knowledge of Facebook advertising.
Here are some quality sites worth checking out:
Facebook Ads Specialist Salary
So, how much do Facebook Specialists make?
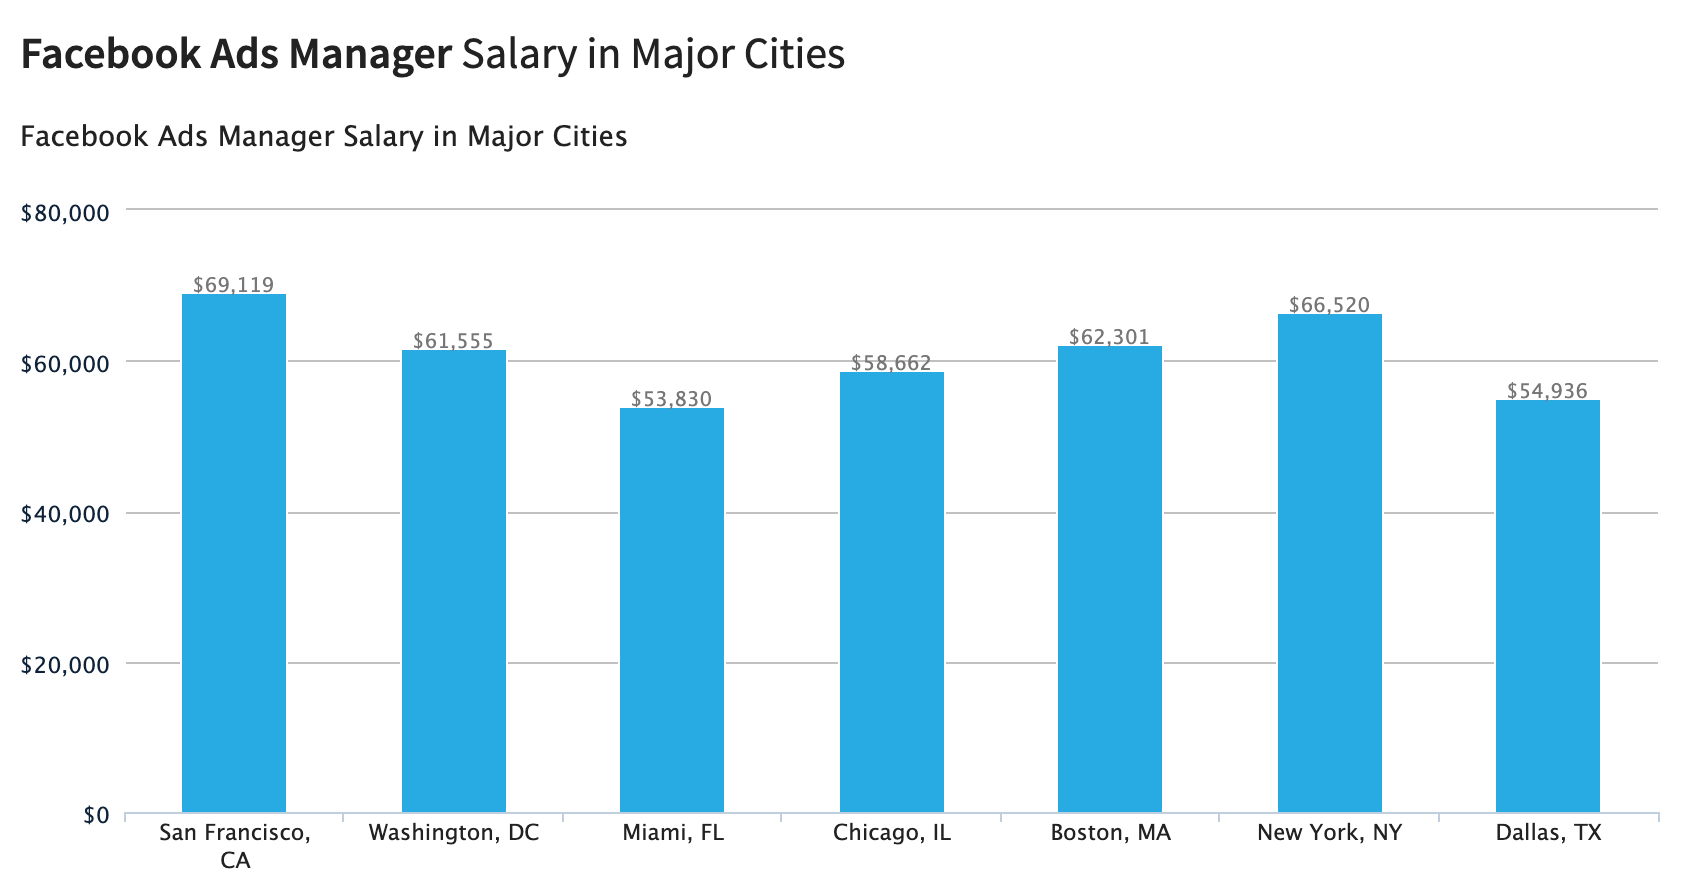
Salaries for Facebook Ads Specialists range between $54k and $87K per year, with the average being $55K.
Salary differences depend on various factors, including years of experience, education, certifications, and location.
Key Learnings
Facebook advertising is an effective marketing channel for businesses across industries.
Running successful Facebook marketing campaigns requires extensive knowledge and skills.
This leads companies to hire Facebook Ads experts who know everything about advertising on Facebook.
Facebook Ads specialists have a range of responsibilities, including:
- Planning Facebook Ad campaigns
- Creating graphics and ad copy
- Analyzing campaign performance and making optimizations
- Installing tracking pixels
You can start your journey to becoming a Facebook Ads expert by completing the following steps outlined in this guide.
