- 1. Setup a Staging Website
- 2. Preserve All Existing Site Content
- 3. Don't Change Content On Pages That Rank Well
- 4. Check For Broken Links
- 5. Set Up 301 Redirects (If Changing URLs or Domains)
- 6. Make The Switch To The New Website
- 7. Verify New Website With Google Search Console
- 8. Fix Any Indexing Issues After Launch
- 9. Resubmit Your XML Sitemap To Google And Bing
- 10. Monitor Your Rankings
- Final Thoughts
Redesigning your website can improve its look, functionality, and user experience but can hurt your SEO if done incorrectly. Search engines may get confused, leading to lost rankings and traffic.
We’ve handled hundreds of website migrations and redesigns over the last twenty years. One thing is clear: if you don’t take the right steps, you risk losing traffic, rankings, and even search engine trust.
This guide will walk you through exactly how to redesign or move your website without damaging your SEO.
1. Setup a Staging Website
Before making any changes, create a staging website. This is a copy of your site where you can safely test the new design. Having a staging website makes it easier to fix any issues and test your new design before moving the changes to your live site.
Most hosting providers offer staging environments, so check with your hosting provider. You can set up your test website as a subdomain (e.g., staging.yourdomain.com) or as a new domain.
In terms of SEO, you must ensure that Google does not index your staging website to avoid duplicate content issues.
If you use WordPress, Go to Settings > Reading and check the “Discourage search engines from indexing this site” option.

For all websites: Edit your robots.txt file and add the following lines of code:
 User-agent: *

Disallow: /
The above code blocks all search engines from accessing the website.
IMPORTANT: Don't transfer these settings to the new website when it is deployed live!
Additional best practices to consider for staging websites include:
- Use Password Protection for Extra Security: Even though search engines are blocked, your staging site is still accessible if someone knows the URL. Adding password protection ensures that only authorized users can access it.
- Keep Your Staging Site on the Same Hosting Environment: To ensure accurate performance testing, your staging site should run on the same hosting server as your live site.
2. Preserve All Existing Site Content
Do not remove any content unless it is really necessary. Search engines have already indexed your existing content, and deleting or changing it can cause a drop in rankings.
Search engine crawlers understand your site based on its current structure and content. If important pages disappear or URLs change without proper redirects, your SEO rankings will be negatively affected.
If you plan to change the content, it is better to finish the site redesign (or domain change) first and then start changing/removing/adding new content.
3. Don't Change Content On Pages That Rank Well
Similarly, if a page ranks high on Google, ensure that the content remains intact. This means keeping the titles, meta descriptions, images, and main content the same during a website redesign.
As explained above, this task should be performed after the new website goes live and has no problems with indexing.
4. Check For Broken Links
After redesigning your website, it’s crucial to check for broken links before going live. Even small changes, like updating your site’s structure, moving pages, or renaming files, can result in broken internal links, missing images, or faulty scripts.
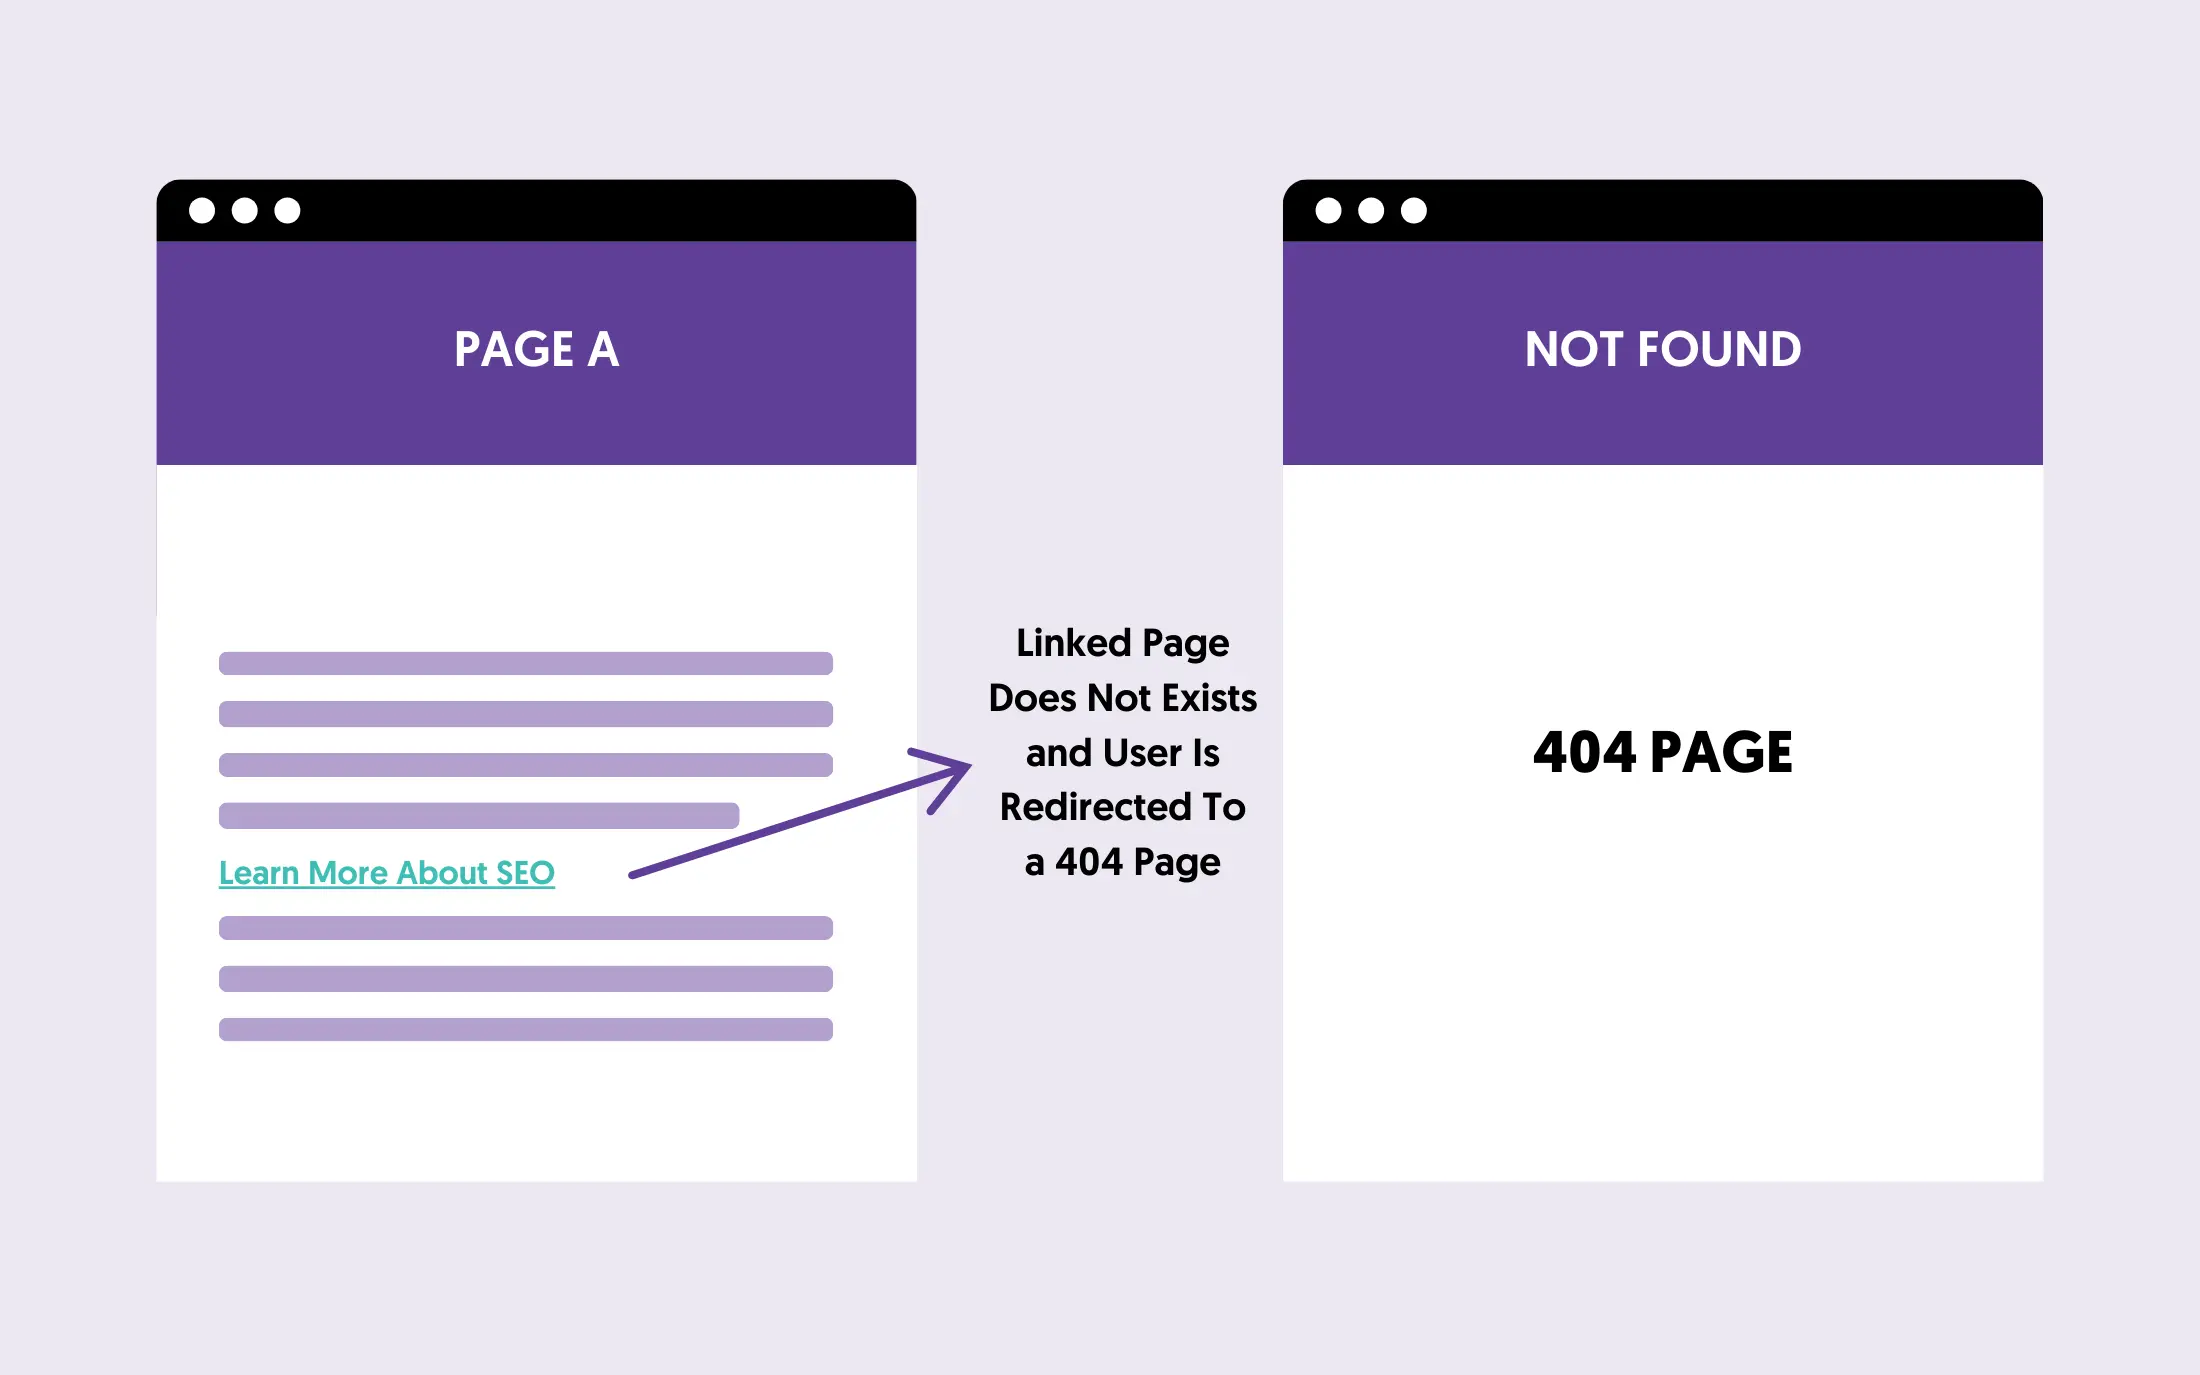
While broken CSS or JavaScript files won’t directly hurt your SEO, they can impact user experience and site functionality. More importantly, broken internal links and missing pages can harm SEO if they affect important pages of your website.
Use tools like Screaming Frog, Ahrefs, or Google Search Console to scan your site for broken links. Fix them now to ensure a smooth transition when you launch the new website.
5. Set Up 301 Redirects (If Changing URLs or Domains)
If you change your page URLs during a redesign, you must set up 301 redirects to tell search engines where the new pages are. Without them, search engines will see the old URLs as missing (404 errors), which can hurt your rankings and cause traffic loss.
Why 301 Redirects Are Important
- They pass SEO value from the old URL to the new one.
- They ensure users and search engines find the correct pages instead of hitting broken links.
- They keep external links and bookmarks working, preserving referral traffic.
How to Set Up 301 Redirects
Create a list of your current URLs. The easiest way is to download your sitemap and save it as a text file.
Match old URLs with their new versions. For example:
Old URL: https://example.com/contactus.html
New URL: https://example.com/contact-us
Set up redirects. If using WordPress or an Apache server, add this to your .htaccess file:
Redirect 301 /OLD-PAGE-URL NEW-PAGE-URL
For example:
Redirect 301 /contactus.html https://example.com/contact-us
Notice that we type only the page for the OLD URL and the complete URL path for the NEW URL.
The actual configuration depends on the platform you are using. For more information, read this Google guide on 301.
6. Make The Switch To The New Website
This is a critical step, and you have waited for it for a long time. After all the hard work in designing, developing, and testing, your new website is ready to go live, and it’s only a click away.
What you should do at this stage is switch to the new website all at once.
The alternative would be to do it in stages, especially for big websites, but Google recommends doing it all at once because this will expedite crawling and indexing.
Before hitting the publish button, here’s a pre-launch checklist to review that everything is set correctly:
- Ensure all 301 redirects are in place
- Avoid redirect chains or loops
- Check for broken links & missing pages
- Ensure that no links are still pointing to staging URLs
- Remove any noindex, nofollow tags from your pages
- Check your robots.txt file to ensure you’re not blocking important pages.
- Run your new website through Google PageSpeed Insights and GTmetrix to check load times.
- Optimize images, caching, and scripts if necessary to improve performance.
- Open your site on different browsers (Chrome, Firefox, Edge, Safari) to check for design inconsistencies.
- Ensure your Google Analytics, Google Search Console, and Bing Webmaster Tools accounts are properly linked.
- Test Google Tag Manager and other tracking scripts (e.g., Facebook Pixel, conversion tracking).
- Before making the switch, take a full backup of your existing website (database + files).
- Proofread key pages (Homepage, About, Contact, Services) for spelling, grammar, and formatting issues.
- Test all contact forms, CTA buttons, and interactive elements to ensure they work correctly.
7. Verify New Website With Google Search Console
After going live, the first thing is to check that everything works properly. I would also recommend running a broken links check again, just in case you missed anything from the last test.
The next step is to log in to your Google Search Console and Bing Webmaster tools and ensure the website is still verified.
If not, you should verify it again to monitor how Google and Bing index the new website.
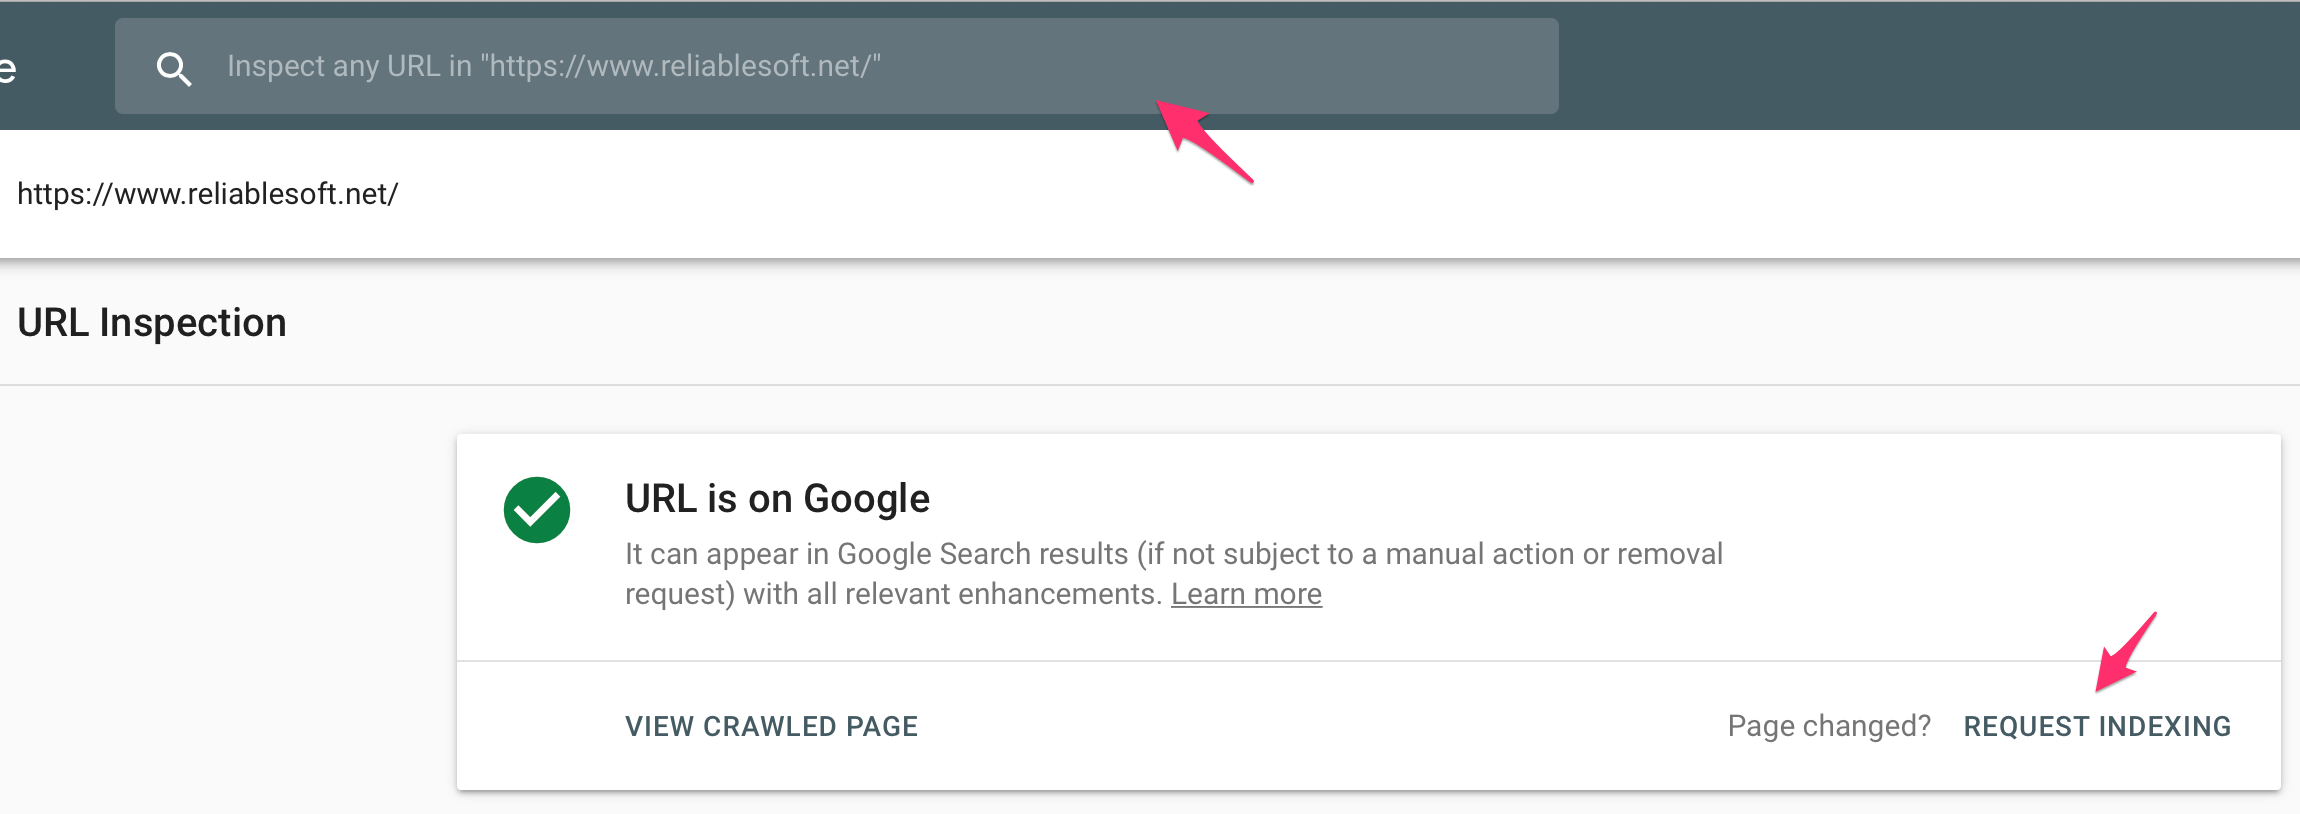
8. Fix Any Indexing Issues After Launch
Once your new website is live, it’s essential to ensure that search engines can crawl and index it correctly. Even with a smooth transition, some pages might not be indexed immediately, or Google may encounter issues.
While in Google Search Console, use the URL INSPECTION tool (from the top bar). Enter a URL and read the report. If the page isn’t indexed, check for issues such as crawl errors, blocked resources, or noindex tags.
If there are no problems, click “Request Indexing” to speed up the process. This tells Google to prioritize crawling the page, reducing the time for updates to appear in search results.
9. Resubmit Your XML Sitemap To Google And Bing
The next and final step is to resubmit your XML sitemap to Google and Bing.
If your URLs have changed, the new XML sitemap will have a new structure. This will help search engines index your redesigned website faster and avoid any unpleasant surprises with your rankings.
10. Monitor Your Rankings
Last, but not least, it is recommended that you have a monitoring system in place before and after a website redesign.
You can either use a keyword ranking tool (I use Semrush ) or do it manually by keeping a record of your ranking positions for different keywords.
You want to identify big changes in rankings, either positive or negative, so that you can take corrective actions.
Keep in mind, though, that it is normal to see big fluctuations in the first few days after the redesign, so don’t panic if you see a sudden drop or get too happy if you see an increase.
Give it a couple of weeks. If rankings don’t recover, analyze those pages and take corrective action.
In most cases, changing the website theme will not negatively impact your SEO. What is more likely to cause problems is changing URLs and page content.
Also, remember that social media counts (likes, tweets, pins) will change if you change the URLs. As soon as you go live, you will notice that your social media counts (for the individual pages and not the domain) will go to zero. Don’t panic.
It may take some time, but sooner or later, social media networks will read the 301 redirections and your hard-earned social media votes will be transferred to the new pages.
Final Thoughts
Don’t be afraid to redesign your website; if you follow the steps above, your SEO won’t be negatively affected.
On the contrary, introducing a modern design that is faster, mobile-friendly, and easy to use without too much clutter will probably improve your rankings and boost your website’s traffic.